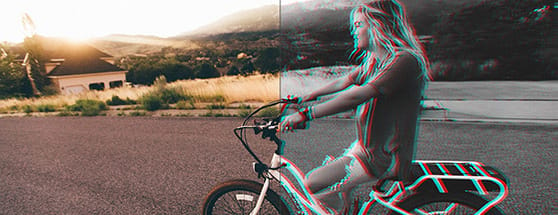
Create a Quick Vintage 3D Effect in Photoshop
 In this tutorial, I?m going to add to the image a bit using the free Dust Particle PS Brush Set found here at WeGraphics. After all, what?s the point of creating a 3D image without something intended to ?come at? the viewer. Also, I will be working with this fantastic image from Unsplash.

Step 1 - Adding Some Particles
First up, I?m going to open the image in Photoshop and install the dust particle brush set. On a new layer above the image, I?ll click and add a few dust particles using a dark (almost black) color. I?ll scale the brush down so that the particles appear pretty small. On another layer I?ll add some lighter colored particles.
 Finally, I?ll add some larger scale particles on another layer, using both the dark and light colors.

Step 2 - Create a Vintage Look
I want this image to appear colder and a bit more dramatic, plus I want it to have a bit of vintage tone to it. We?ll achieve this look with a couple of quick adjustment layers. To mute the colors a bit, let?s add a black and white gradient map adjustment layer. Set this layer?s opacity to 30%. Now add a Curves adjustment layer and adjust each color channel similar to what I have below.


 You should now have a colder, more dramatic, look to your photo.

Step 3 Creating the 3D Effect
Now for the 3D portion. Flatten your image by clicking Layer | Flatten Image. Now copy the background image by pressing Cmd+J (or Ctrl+J on PC). Name this copied layer ?Red?. Double click the layer to open the Layer Styles. Under Blending Options | Advanced Blending uncheck the R (Red) box next to Channels. Now duplicate the layer and name it ?Blue?. Double click to open up the Layer Styles again. This time make sure R is checked and G and B are unchecked.
 Now select the ?Red? layer and nudge it 5 pixels to the left using the arrow keys on your keyboard. Then select the ?Blue? layer and nudge it 5 pixels to the right.
 That?s it! A very simple process to create a wonderful vintage look. Here?s some more samples I created using this technique. Also, be sure to check out our free 3D Effect Actions Pack for Photoshop, and create these effects with a single click!


 Looking for some other vintage style resources? Check out this Vintage Postcard Generator from our friends over at Medialoot for a really cool vintage style that's totally different than this one.
More from Tutorials

How to Easily Remove Smoke From The Background in Photoshop
Tutorialsby Diego Sanchez
Smoke images can be used in a wide range of applications across various designs, such as adding drama to a photograph, crafting captivating visual effects on posters, or even giving your artwork a mysterious halo. Whichever the case, transparent smoke can serve as a powerful tool in your arsenal. So today, I will show you how easy it is to remove the background from a smoke image, and in the process, prepare the file to change the smoke color at any time you want, allowing you to seamlessly integrate it into your projects.
Read more
Easily Make a Glass Texture Effect in Photoshop
Tutorialsby Diego Sanchez
The glass effect has been used by many designers and photographers to add depth and dimension to their compositions with a touch of modern elegance. There are, of course, many different ways to apply a glass effect in Photoshop, but today I will show you how easy it is to make your own glass texture and apply realistic distortion to any of your images using nothing but the default Photoshop tools.
Read more
How to Easily Make Your Vector Digital Signature
Tutorialsby Diego Sanchez
In today's digital life, whether you are a freelancer, a business owner, or simply someone who frequently engages in digital transactions, having a well-crafted digital signature is almost indispensable to add a touch of authenticity and credibility to your documents. So today, I will show you how easily you can make your own vector digital signature in Illustrator for you to sign your digital documents or incorporate it into any design work.
Read more
Easily Make an Editable Grunge Text Effect in Photoshop
Tutorialsby Diego Sanchez
There are different ways to make a grunge text effect in Photoshop while keeping your text fully editable, and the most known one is to use a texture as a layer mask to hide part of the text. But Today I will show you a differnt approach on how you can make this kind of effect, while keeping you text fully editable and at the same time give you a bit more control over that effect by using a texture in a new layer (instead of a layer mask) that you can later move, scale, replace or combine with other textures without replacing any kind of layer mask.
Read more