Turn a Photo into an Engraved Illustration Using Photoshop
I have a collection of old books that I've never read. I have them because I love the look of the engraved style illustrations found within the pages. There's something about that look that is incredible. The cross hatched lines that go from thick to thin to make up the shadows and highlights. It's a very distinctive style that has a vintage appeal.
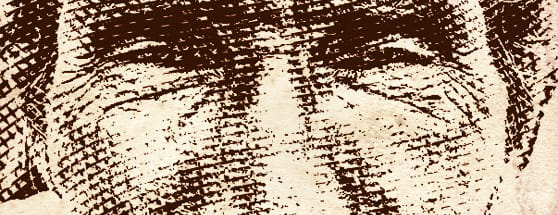
I recently set out to see if I could mimic this look in Photoshop using a photograph. What I found was that with the help of Adobe Illustrator, the look can be achieved very easily. Lets take a look. Here is what we'll be creating. And here is the original photo that I used. I love this photo! It's titled "baavla, the charmer" and is by nandadevieast.

 Next we'll need to duplicate this line (Copy and Paste) and move it down below the canvas. Select both lines and angle them so that they are over the canvas like I have below.
 Now select (Object | Blend | Blend Options). Choose "Specified Steps" and enter 150.
 Select (Object | Blend | Make). Now we have a set of evenly spaced lines that will work as in our engraving.
 We'll need to repeat this process six times, and each time we'll need to increase the stroke of our set of lines back in Illustrator. I used stoke widths of (1, 3, 6, 7, 8) for my lines.
When you're done your layers panel should look like this, with each set of lines gradually getting thicker.
NOTE: On the 4th layer turn your lines 90 degrees clockwise to create some vertical line variation.

 Make a copy of the layer (Cmd+J) and click (Image | Adjust | Threshold) and enter 200 for the level.
 Next, we'll be making a selection of all of the black areas. To do this click (Select | Color Range), and choose "Shadows" from the drop down.
 Once you click "Okay" a selection of all of the black areas will be made. Back over on the layers panel, click to turn the visibility on for layer 1 (the layer containing the thinnest stroke lines), and click the "Add layer mask" icon at the bottom of the panel.
 This will create a mask of the engraved lines for layer 1.
 We'll need to repeat this step for each of our engraved lines layers. Make a copy of the original photo each time, and reduce the threshold amount. I used 200, 160, 120, 100, 80, 60 for each of my threshold settings.
When you're done you should have a file that looks similar to this:

 For the final adjustment, I had to add a texture. You know how I roll? I chose a texture from the Old Papers Texture Set here at WeGraphics. I used a color adjustment layer to tint the black lines to a brown.
 That's it! I love this effect. Try it out on some different photos, adjust the line weights and threshold amounts for different looks. Experiment and have fun!
I recently set out to see if I could mimic this look in Photoshop using a photograph. What I found was that with the help of Adobe Illustrator, the look can be achieved very easily. Lets take a look. Here is what we'll be creating.
 And here is the original photo that I used. I love this photo! It's titled "baavla, the charmer" and is by nandadevieast.

Step 1 Creating the Engraved Lines
First up, we need to do some file prep before we add our photo. We'll use Adobe Illustrator to create the wavy engraved lines. If you're more comfortable drawing with the pen tool in Photoshop you can stay within the program. But I prefer Illustrator because it's the vector tool that I'm used to. In Illustrator create a new file 1000x1000 pixels. You'll then use the Pen Tool (P) to create a wavy line with a 1 pixel stroke. My line has four evenly spaced points that I moved and edited to create this line. Next we'll need to duplicate this line (Copy and Paste) and move it down below the canvas. Select both lines and angle them so that they are over the canvas like I have below.
 Now select (Object | Blend | Blend Options). Choose "Specified Steps" and enter 150.
 Select (Object | Blend | Make). Now we have a set of evenly spaced lines that will work as in our engraving.
Step 2 Add Engraved Lines to the Document
Back over in Photoshop, lets create a new document at 1000x1000 pixels. From Illustrator, we need to copy and paste our set of lines. When you copy them over Photoshop will ask how you want to paste them. Select "Pixels" from the available options. Move the newly pasted lines to the center of the document and press enter. We'll need to repeat this process six times, and each time we'll need to increase the stroke of our set of lines back in Illustrator. I used stoke widths of (1, 3, 6, 7, 8) for my lines.
When you're done your layers panel should look like this, with each set of lines gradually getting thicker.
NOTE: On the 4th layer turn your lines 90 degrees clockwise to create some vertical line variation.

Step 3 Adding the Photo
Turn off all of your lines layers. On the bottom most layer, paste the photo the man. I used a Levels adjustment to bring out the contrast a bit. Make a copy of the layer (Cmd+J) and click (Image | Adjust | Threshold) and enter 200 for the level.
 Next, we'll be making a selection of all of the black areas. To do this click (Select | Color Range), and choose "Shadows" from the drop down.
 Once you click "Okay" a selection of all of the black areas will be made. Back over on the layers panel, click to turn the visibility on for layer 1 (the layer containing the thinnest stroke lines), and click the "Add layer mask" icon at the bottom of the panel.
 This will create a mask of the engraved lines for layer 1.
 We'll need to repeat this step for each of our engraved lines layers. Make a copy of the original photo each time, and reduce the threshold amount. I used 200, 160, 120, 100, 80, 60 for each of my threshold settings.
When you're done you should have a file that looks similar to this:

Step 4 Final Adjustments
You could call this complete at this point, but I like to to tweak things a bit. For my final image I duplicated layer 4 (middle stroke weight, vertical lines), removed the mask and inverted it to white. This broke up the lines a little further. Then I moved it down a couple of layers. For the final adjustment, I had to add a texture. You know how I roll? I chose a texture from the Old Papers Texture Set here at WeGraphics. I used a color adjustment layer to tint the black lines to a brown.
 That's it! I love this effect. Try it out on some different photos, adjust the line weights and threshold amounts for different looks. Experiment and have fun!