Painting with Fire Using Photoshop's Liquify Filter
Below is a preview of what we'll be creating.

Step 1
We need to grab a couple of images. I used this horse image and a photo of a camp fire. In Photoshop let's create a new document 1000 x 1000 pixels with a black background. I used the Quick Selection Tool (W) to make a rough selection of the horse to extract and paste onto the black background in our new document. You'll have to clean the edges up a bit with the eraser tool. Here's mine after a few touch ups on the edges.
 Next we need to sharpen the details of the horse a bit. Create a duplicate layer of the horse and select (Filter | Other | High Pass). Choose a Radius value around 6 or 7 and click Okay. Set this layers Blending Mode to Overlay.

Step 2
Now let's grab some fire from the campfire photo. I made a rough selection around the upper portion of the flames so that no logs are selected. Once you've copied and pasted the fire over to our working document, you'll need to scale and rotate (Cmd + T) the flames to fit along the back of the horse's neck.
 Don't worry about the scale being out of proportion, we're going to change that within the Liquify Filter.
Once you've finished scaling the flames to the right size and angle. Choose (Filter | Liquify) to open the Liquify Filter. In the new window I used the Forward Warp Tool and Twirl Tool to move and shape the flames in the direction I wanted.
Don't worry about the scale being out of proportion, we're going to change that within the Liquify Filter.
Once you've finished scaling the flames to the right size and angle. Choose (Filter | Liquify) to open the Liquify Filter. In the new window I used the Forward Warp Tool and Twirl Tool to move and shape the flames in the direction I wanted.
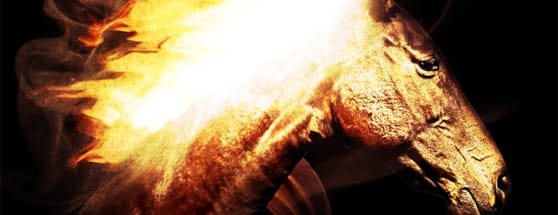
 Below are my final results with the Liquify Filter. I was aiming for a little bit of a wind blown look. Your results will vary, of course.

Step 3
Now let's add a little bit of smoke beyond the flames. I used the Smoke Textures and Brushes Vol1 set here at WeGraphics. I placed a brush from the collection on a layer above the flames. I set the opacity to 20%. Next I want to add some highlights around the fire to help blend it with the horse's neck. I did this by creating a new layer with a blending mode set to Overlay, and painting with a soft white brush where I felt like the highlights should appear around where the fire is most intense.
 To add the final touches I want to adjust the color a bit. I added two more elements to accomplish this. The first is a new layer above all others with a single soft brush set to #fabe6b for the color. I set this layers Blending Mode to Overlay.
 Next, I created a new Gradient Map Adjustment Layer using the settings below.
 The red is: #ff1e00 and the orange is: #ffa800.
For the final step, I added a gradient from the Subtle Grunge Vol 2 texture pack, and placed it above all layers with the Blending Mode set to Overlay.
Below is the finished piece.
The red is: #ff1e00 and the orange is: #ffa800.
For the final step, I added a gradient from the Subtle Grunge Vol 2 texture pack, and placed it above all layers with the Blending Mode set to Overlay.
Below is the finished piece.
Conclusion
I hope you've found this quick tutorial fun and interesting. Use the comment fields below to let us know how you've used the Liquify Filter in Photoshop.More from Tutorials

How to Easily Remove Smoke From The Background in Photoshop
Tutorialsby Diego Sanchez
Smoke images can be used in a wide range of applications across various designs, such as adding drama to a photograph, crafting captivating visual effects on posters, or even giving your artwork a mysterious halo. Whichever the case, transparent smoke can serve as a powerful tool in your arsenal. So today, I will show you how easy it is to remove the background from a smoke image, and in the process, prepare the file to change the smoke color at any time you want, allowing you to seamlessly integrate it into your projects.
Read more
Easily Make a Glass Texture Effect in Photoshop
Tutorialsby Diego Sanchez
The glass effect has been used by many designers and photographers to add depth and dimension to their compositions with a touch of modern elegance. There are, of course, many different ways to apply a glass effect in Photoshop, but today I will show you how easy it is to make your own glass texture and apply realistic distortion to any of your images using nothing but the default Photoshop tools.
Read more
How to Easily Make Your Vector Digital Signature
Tutorialsby Diego Sanchez
In today's digital life, whether you are a freelancer, a business owner, or simply someone who frequently engages in digital transactions, having a well-crafted digital signature is almost indispensable to add a touch of authenticity and credibility to your documents. So today, I will show you how easily you can make your own vector digital signature in Illustrator for you to sign your digital documents or incorporate it into any design work.
Read more
Easily Make an Editable Grunge Text Effect in Photoshop
Tutorialsby Diego Sanchez
There are different ways to make a grunge text effect in Photoshop while keeping your text fully editable, and the most known one is to use a texture as a layer mask to hide part of the text. But Today I will show you a differnt approach on how you can make this kind of effect, while keeping you text fully editable and at the same time give you a bit more control over that effect by using a texture in a new layer (instead of a layer mask) that you can later move, scale, replace or combine with other textures without replacing any kind of layer mask.
Read more