How to Create Incredible Photoshop Brushes from Hand-Made Art
The Tools
 For this set I used Strathmore Newsprint for the paper. I like newsprint for some techniques because it's very soft and thin and almost like cloth. It can be soaked with liquid and then dry without being totally destroyed. I've gone so far as to completely dunk a sheet of newsprint into water, and it still stayed in tact.
 For the ink/paint I'm using an inexpensive black acrylic paint that can be found at any hobby store. We're going to thin this paint down with water to the consistency of ink.
 For good measure, I'm throwing in some bleach. Awesome effects can occur when you introduce bleach into the mix. It not only effects the paint but also effects the paper as well. This is a great example of trying something off the wall. The most important part of creating Photoshop brushes is to experiment wildly.
 You'll need a nice collection of brushes, but don't buy expensive ones. Instead grab a tone of cheap ones in all shapes and sizes. Different sized brushes in varied shapes produce different effects, so it's nice to have a variety on hand.
The Process
I'm going to start by adding bleach to one of my glasses and paint to the other. We want to thin the paint down in order to splatter it. I used just a bit of water to get the paint to the consistency of ink.
 You can see from the above photo that the paint is much thinner than what's originally in the bottle. But don't get it too thin or it will spread and soak into the paper too much and we'll lose contrast in the final brush.
Next, I poured a little bit of bleach onto the newsprint.
You can see from the above photo that the paint is much thinner than what's originally in the bottle. But don't get it too thin or it will spread and soak into the paper too much and we'll lose contrast in the final brush.
Next, I poured a little bit of bleach onto the newsprint.
 Be careful here, we don't want too much, just a nice puddle that we can add our paint to.
 Okay, now for things start to get fun. I dipped the brush into the paint, and held it an inch or two above the bleach puddle and used my finger to "flick" the bristles. This creates a nice splatter effect.

 Now repeat this several times in slightly different directions, and don't be afraid to mess up. This is not an exact process, just keep working until you are happy with the result.
 You can see from the above photo that the paint behaves different over the bleach puddle and on the bare paper.
 One brush down... Now we'll have to wait for the bleach to dry before laying on the scanner.
 Word of caution... You're going to get messy. That's part of it... And you might smell like bleach for a day or two. All in the name of art, right?
Scanning and Finishing Up
Next I scanned the image. Below is the result of the scanned image with no alteration within Photoshop. To create the brush I started with a blank canvas set to Grayscale 2500x2500 pixels. This is the max allowed brush size within Photoshop.
I then copied the scan over to the new document and resized and angled the splatter a bit to fit within the square document.
To create the brush I started with a blank canvas set to Grayscale 2500x2500 pixels. This is the max allowed brush size within Photoshop.
I then copied the scan over to the new document and resized and angled the splatter a bit to fit within the square document.
 Now we want to take out all of the gray so that we're left with only black and white. To do this go to (Image | Adjust | Levels). Below are the setting that I needed to remove all gray. This will vary depending on your scan.
 Now we can create the brush by going to (Edit | Define Brush Preset...). Now the brush is saved to the brushes palette as the very last brush in your current library.
Here's a shot of my final brush.
Now we can create the brush by going to (Edit | Define Brush Preset...). Now the brush is saved to the brushes palette as the very last brush in your current library.
Here's a shot of my final brush.
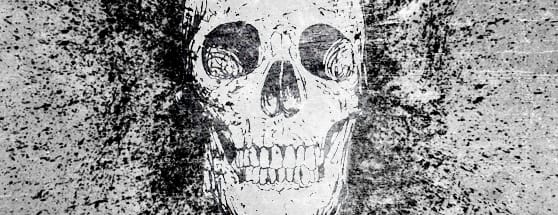
 Now let's take it for a test drive. The piece below was created in minutes using only this brush plus a skull from the Hand Drawn Vector Skulls collection and a grunge texture from the Subtle Grunge Textures pack.
 Download my brush for a closer look.
Conclusion
Hopefully after reading this tutorial you can see how stepping away from the computer and creating something by hand can add a creative touch to your art. Experiment with this process and see what you can create, then come back and share it with us using the comment fields below. Happy designing!More from Tutorials

How to Easily Remove Smoke From The Background in Photoshop
Tutorialsby Diego Sanchez
Smoke images can be used in a wide range of applications across various designs, such as adding drama to a photograph, crafting captivating visual effects on posters, or even giving your artwork a mysterious halo. Whichever the case, transparent smoke can serve as a powerful tool in your arsenal. So today, I will show you how easy it is to remove the background from a smoke image, and in the process, prepare the file to change the smoke color at any time you want, allowing you to seamlessly integrate it into your projects.
Read more
Easily Make a Glass Texture Effect in Photoshop
Tutorialsby Diego Sanchez
The glass effect has been used by many designers and photographers to add depth and dimension to their compositions with a touch of modern elegance. There are, of course, many different ways to apply a glass effect in Photoshop, but today I will show you how easy it is to make your own glass texture and apply realistic distortion to any of your images using nothing but the default Photoshop tools.
Read more
How to Easily Make Your Vector Digital Signature
Tutorialsby Diego Sanchez
In today's digital life, whether you are a freelancer, a business owner, or simply someone who frequently engages in digital transactions, having a well-crafted digital signature is almost indispensable to add a touch of authenticity and credibility to your documents. So today, I will show you how easily you can make your own vector digital signature in Illustrator for you to sign your digital documents or incorporate it into any design work.
Read more
Easily Make an Editable Grunge Text Effect in Photoshop
Tutorialsby Diego Sanchez
There are different ways to make a grunge text effect in Photoshop while keeping your text fully editable, and the most known one is to use a texture as a layer mask to hide part of the text. But Today I will show you a differnt approach on how you can make this kind of effect, while keeping you text fully editable and at the same time give you a bit more control over that effect by using a texture in a new layer (instead of a layer mask) that you can later move, scale, replace or combine with other textures without replacing any kind of layer mask.
Read more