How to Create an Easy Dispersion Effect in Photoshop
 WeGraphics members will want to grab this brush set for the tutorial:
Splatters Volume 2
For non-WeGraphics members a good free alternative can be found here:
Splatters Brush Set
WeGraphics members will want to grab this brush set for the tutorial:
Splatters Volume 2
For non-WeGraphics members a good free alternative can be found here:
Splatters Brush Set
Step 1
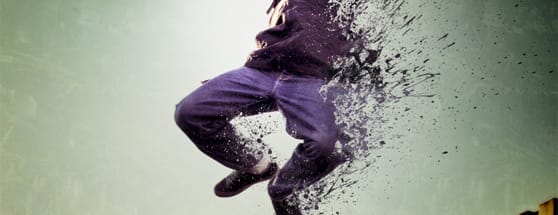
After a little bit of searching I found this photo of a guy jumping in the air by Camera Eye Photography. This is a great photo for this effect because the subject is in motion. So our dispersion effect will help to enhance that motion. Copy and paste the photo into a new PS document. I sized mine down to 2500px wide. Using the Quick Selection Tool (W), I made a selection of the guy and copied and pasted him to a new layer. I then loaded the selection again, and with the background layer selected, I chose (Edit | Fill | Content Aware). Content Aware did a pretty good job of removing the guy from the background. There is still a silhouette visible, but that's okay, we'll be covering most of it up. We just want some of the background color to show through. If you're extra picky, you can remove the silhouette with the Clone Stamp Tool (S).
Step 2
Lets go ahead and duplicate the guy layer one time. So you should have two layers that have our guy jumping. Select the bottom most guy layer and press (Cmd+T) to transform him. You want to stretch the guy horizontally. I roughly selected his arm and leg and moved them back to the edge of the non-distorted guy in the layer above. The idea here is that we're giving a color area for our splatters to pick up via a mask.
Lets go ahead and create that mask for the distorted guy layer. Select the distorted guy layer and click the layer mask icon at the bottom of the layers palette. Fill the mask with solid black.
I roughly selected his arm and leg and moved them back to the edge of the non-distorted guy in the layer above. The idea here is that we're giving a color area for our splatters to pick up via a mask.
Lets go ahead and create that mask for the distorted guy layer. Select the distorted guy layer and click the layer mask icon at the bottom of the layers palette. Fill the mask with solid black.
 Now use the splatter brushes to reveal portions of the layer by clicking the mask using solid white as the foreground color.
For the top non-distorted guy layer, we also want to create a layer mask. But this time we want to leave it solid white, and use a black splatter brush to remove portions of the guy to reveal some of the background.
Now use the splatter brushes to reveal portions of the layer by clicking the mask using solid white as the foreground color.
For the top non-distorted guy layer, we also want to create a layer mask. But this time we want to leave it solid white, and use a black splatter brush to remove portions of the guy to reveal some of the background.
 Pretty easy, huh?
Step 3
For the final touches lets add a bit of vignette and highlight. But before we do that... I took one large dark splatter and placed it on a layer behind the guy. I basically just wanted to see some light splatters that fell beyond the distorted guy's layer mask. For the vignette, lets switch over to Quick Mask Mode (Q), and choose a very large soft black brush and click once in the center of the image.
 Switching out of QMM you'll see that we have a selection that excludes the very center of the image. The selection is also nicely feathered due to our soft black brush.
 Now create a new Levels Adjustment Layer above all other layers, and adjust as follows.
 For the final touch, lets add a highlight. Create a new layer above the guy layer, and set its blending mode to Opacity. Now with a soft white brush make 1 or two clicks over the guys head and torso. You may need to reduce the opacity of this layer down to 50% or 60% depending on how hot the highlight appears.
 I hope this quick tutorial has inspired some ideas on how to use PS brushes to create interesting dispersion effects in your artwork. Experiment and have fun!
More from Tutorials

How to Easily Remove Smoke From The Background in Photoshop
Tutorialsby Diego Sanchez
Smoke images can be used in a wide range of applications across various designs, such as adding drama to a photograph, crafting captivating visual effects on posters, or even giving your artwork a mysterious halo. Whichever the case, transparent smoke can serve as a powerful tool in your arsenal. So today, I will show you how easy it is to remove the background from a smoke image, and in the process, prepare the file to change the smoke color at any time you want, allowing you to seamlessly integrate it into your projects.
Read more
Easily Make a Glass Texture Effect in Photoshop
Tutorialsby Diego Sanchez
The glass effect has been used by many designers and photographers to add depth and dimension to their compositions with a touch of modern elegance. There are, of course, many different ways to apply a glass effect in Photoshop, but today I will show you how easy it is to make your own glass texture and apply realistic distortion to any of your images using nothing but the default Photoshop tools.
Read more
How to Easily Make Your Vector Digital Signature
Tutorialsby Diego Sanchez
In today's digital life, whether you are a freelancer, a business owner, or simply someone who frequently engages in digital transactions, having a well-crafted digital signature is almost indispensable to add a touch of authenticity and credibility to your documents. So today, I will show you how easily you can make your own vector digital signature in Illustrator for you to sign your digital documents or incorporate it into any design work.
Read more
Easily Make an Editable Grunge Text Effect in Photoshop
Tutorialsby Diego Sanchez
There are different ways to make a grunge text effect in Photoshop while keeping your text fully editable, and the most known one is to use a texture as a layer mask to hide part of the text. But Today I will show you a differnt approach on how you can make this kind of effect, while keeping you text fully editable and at the same time give you a bit more control over that effect by using a texture in a new layer (instead of a layer mask) that you can later move, scale, replace or combine with other textures without replacing any kind of layer mask.
Read more