How to Create A Detailed Cassette Tape in Photoshop
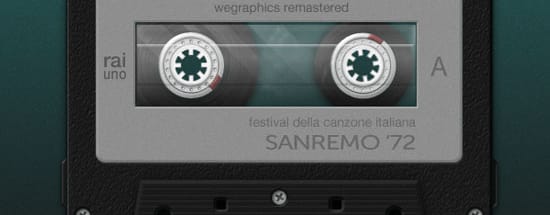
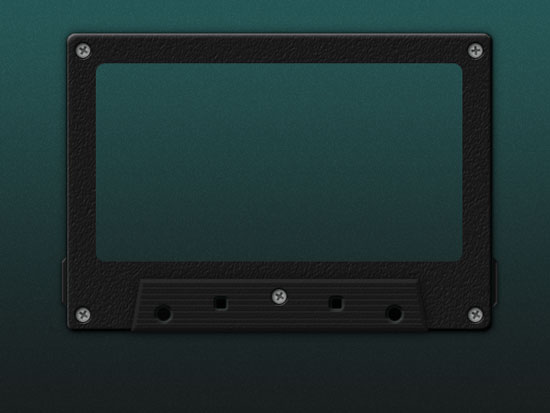
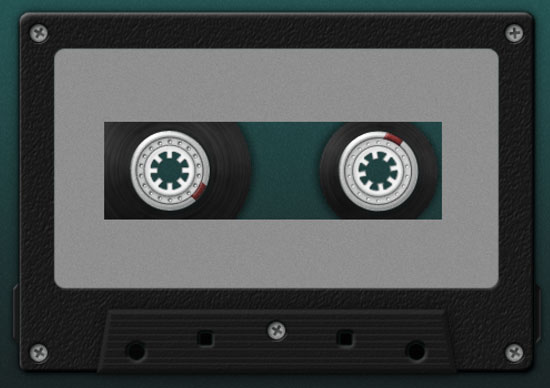
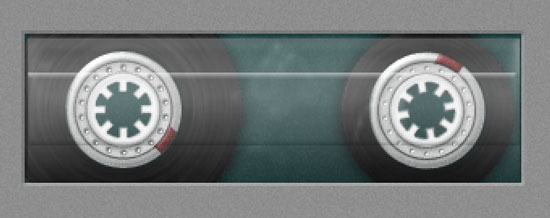
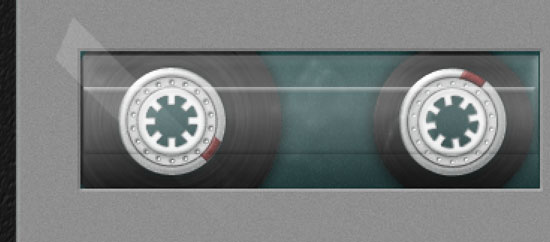
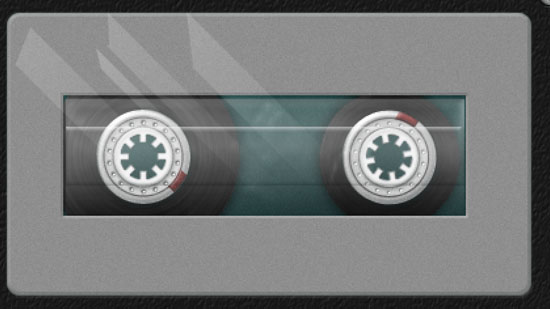
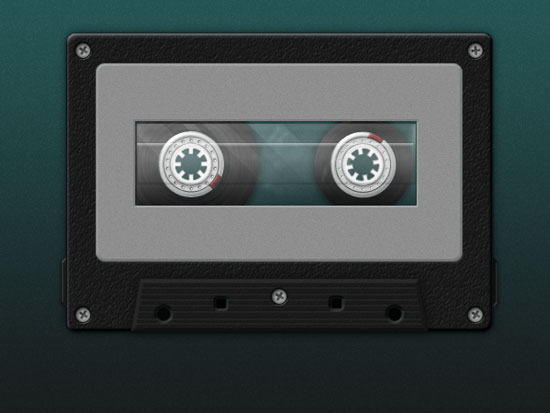
Preview
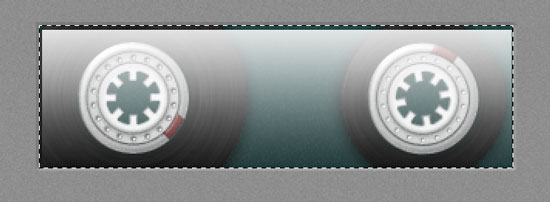
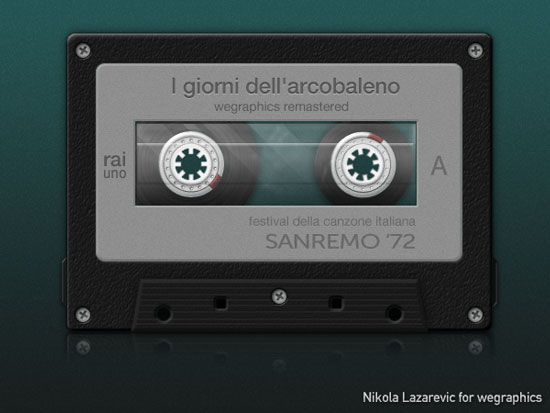
Let's take a look at the preview first.Step 1
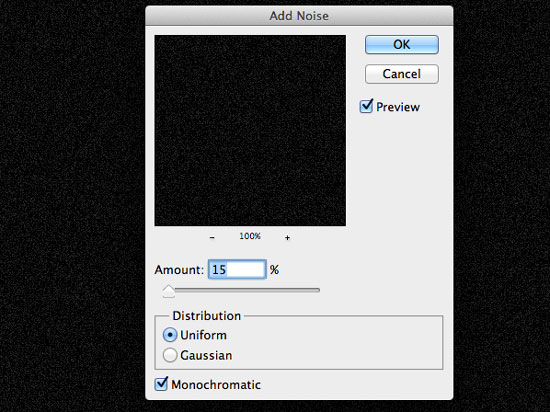
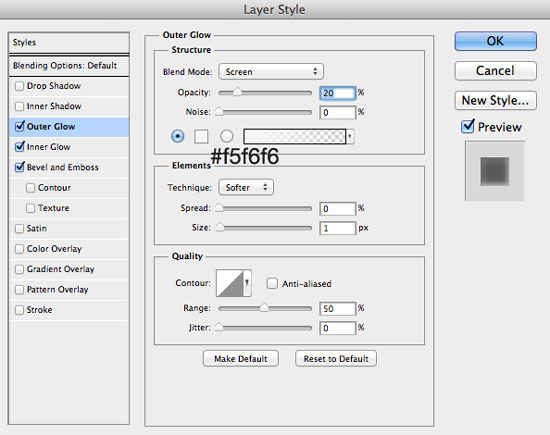
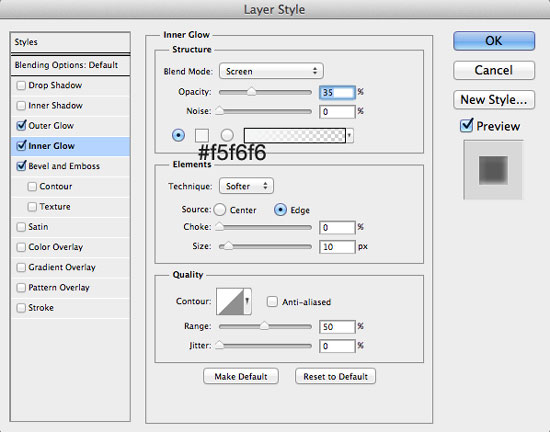
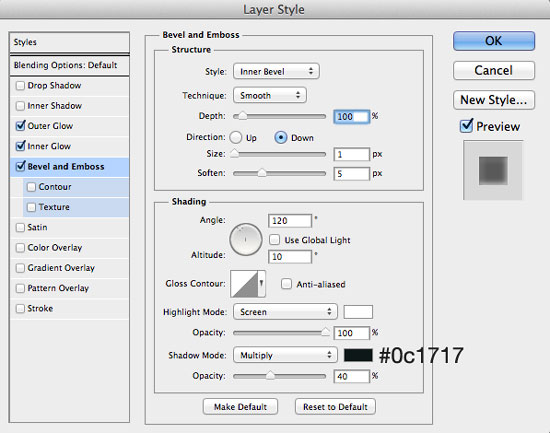
Fire up Photoshop and create a new document sized at 600x450px and fill with any color. Open Layer Styles and apply Gradient Overlay.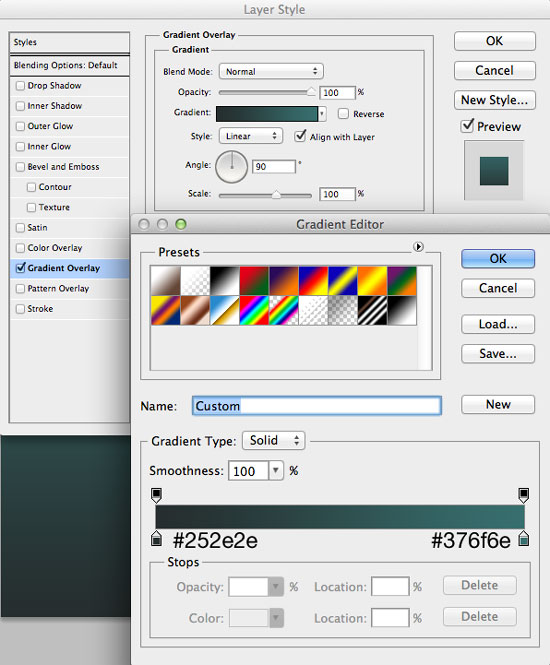 Create new layer on top, fill with black color, give this layer noise,
 change Blend Mode to Soft Light and set Opacity to 45%.
 Finally, merge this two layers.
Step 2
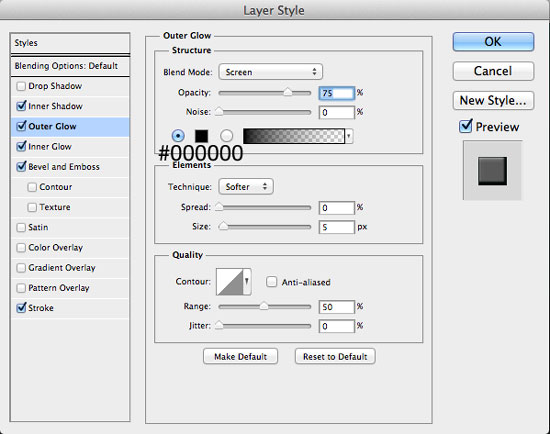
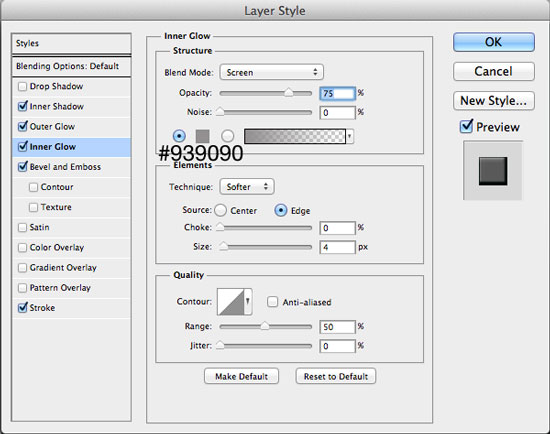
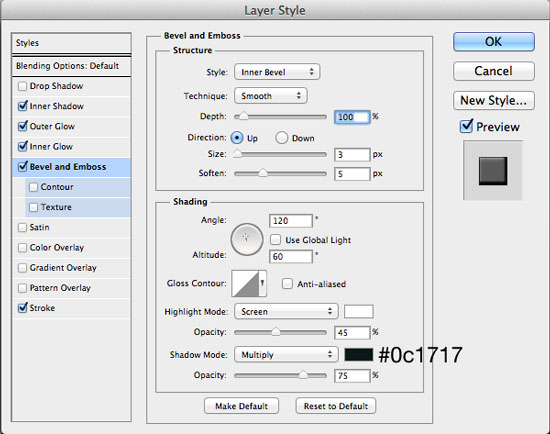
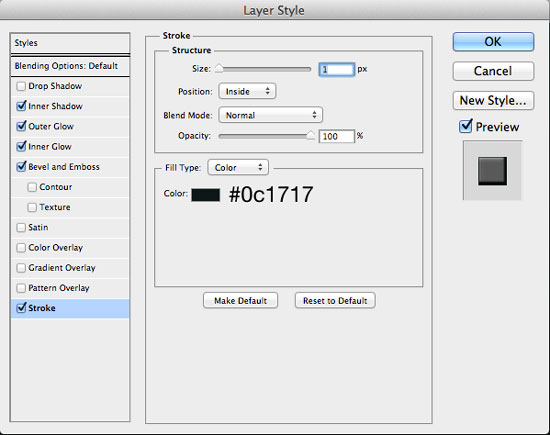
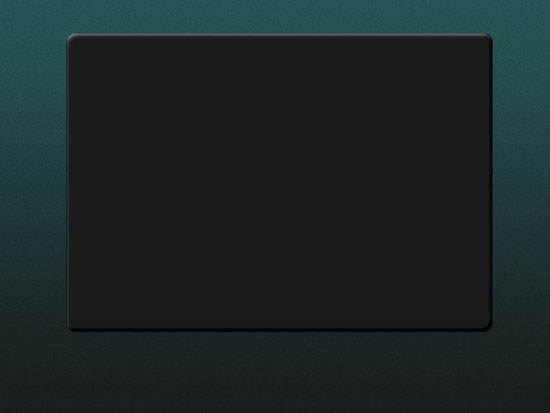
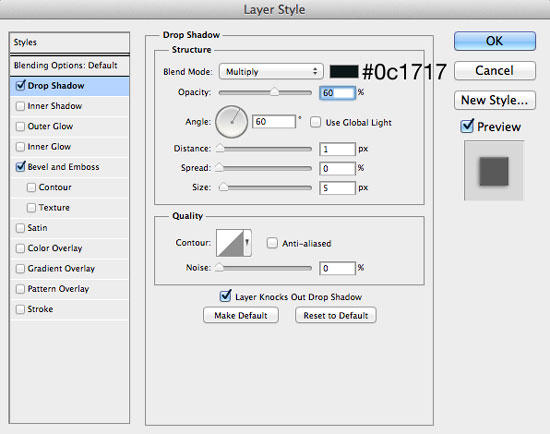
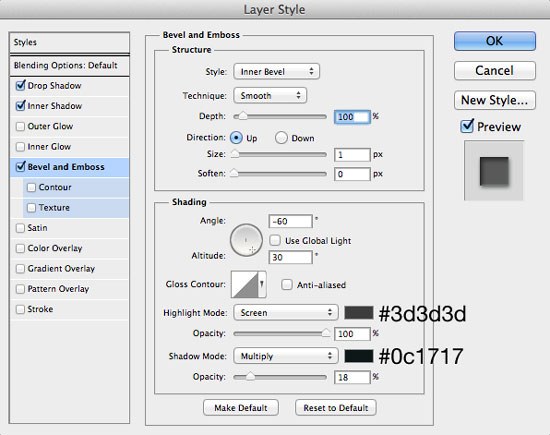
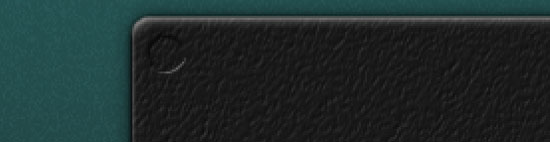
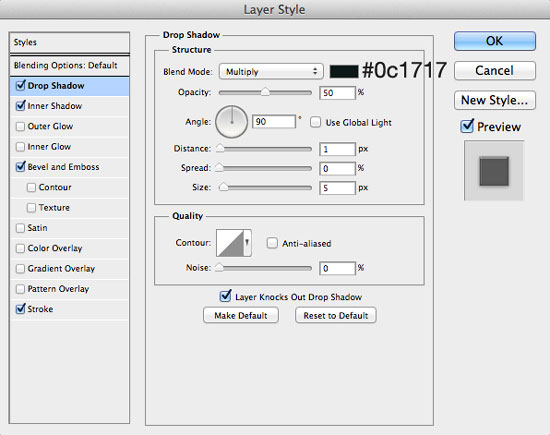
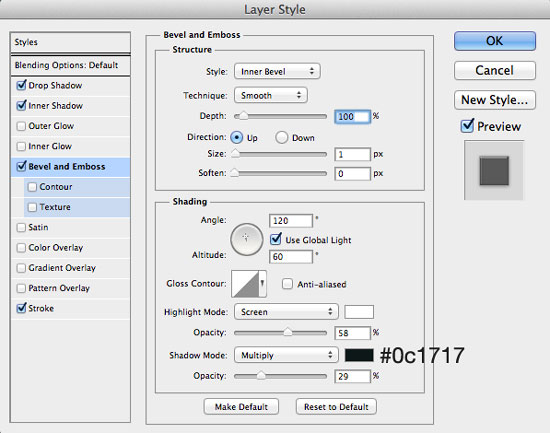
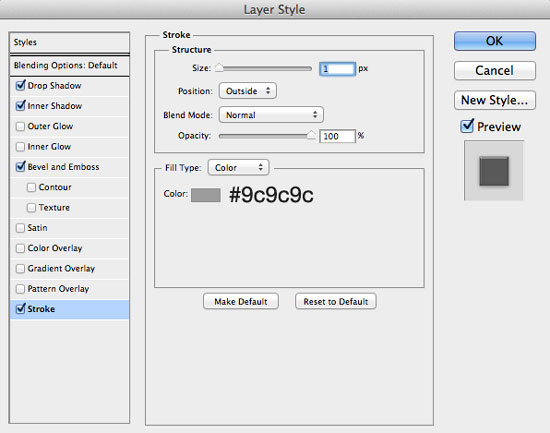
Pick up Rounded Rectangle Tool (U), set the radius to 10 pixels, color to #191919 and draw basic cassette shape. Apply following layer styles:
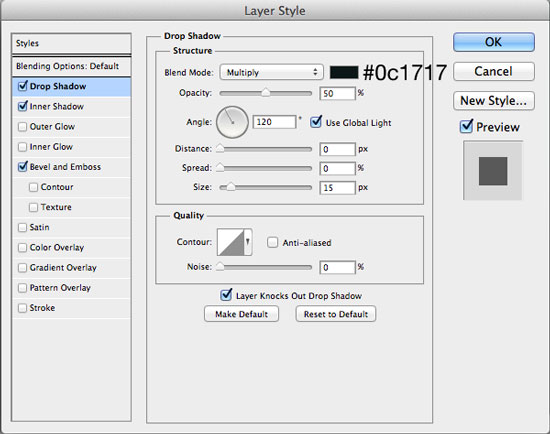
Step 3
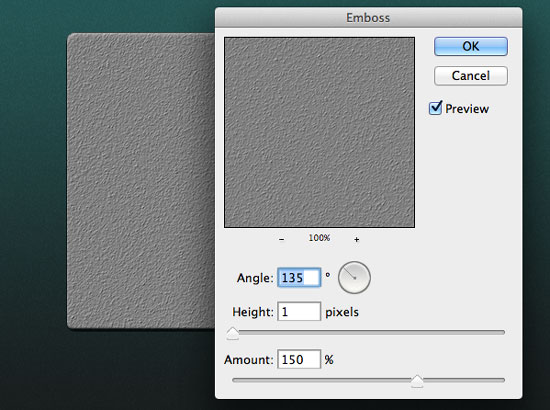
Let's add plastic texture to cassette shape. Create new layer, Create Clipping Mask (Layer > Create Clipping Mask), fill this layer with white color, go to Filter > Noise > Add Noise,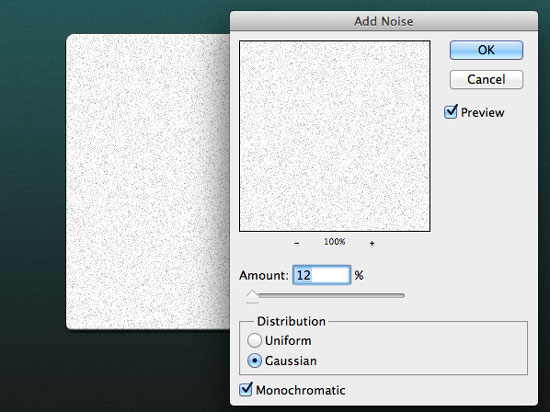 then go to Filter > Stylize > Emboss and set the Angle to 135, Height to 1 and Amount to 150%. Set the Blend Mode to Soft Light.

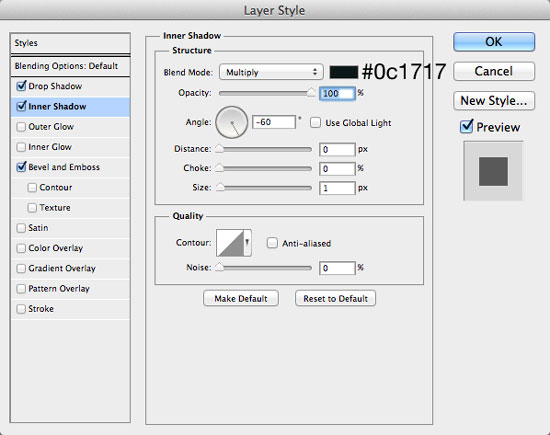
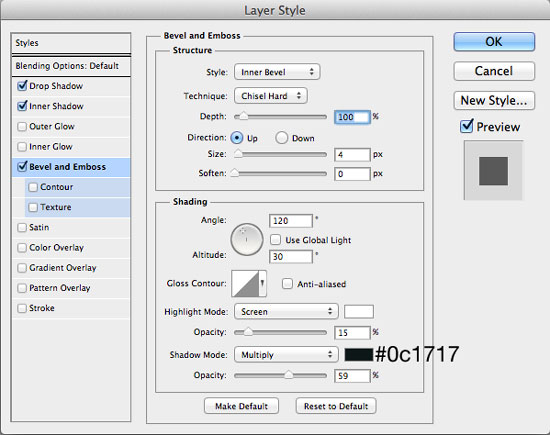
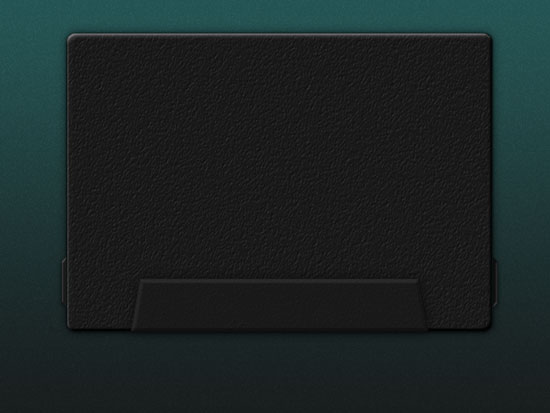
Step 4
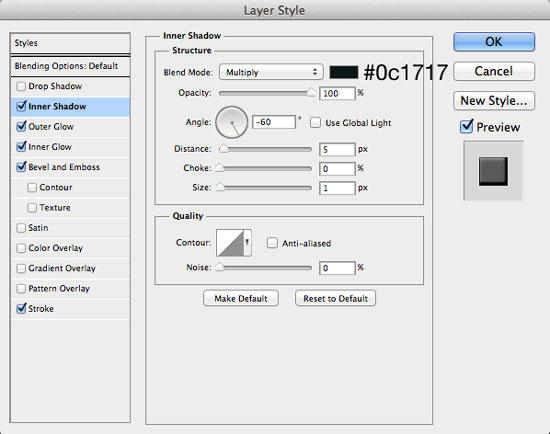
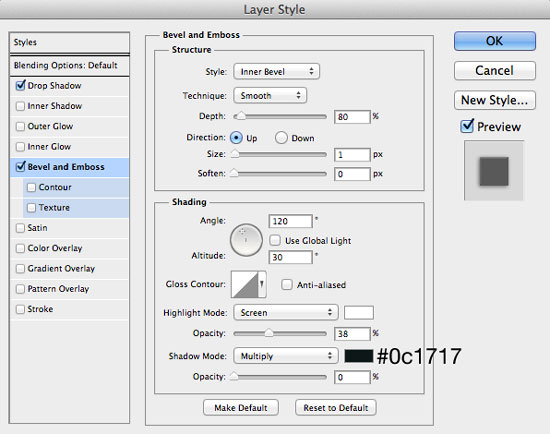
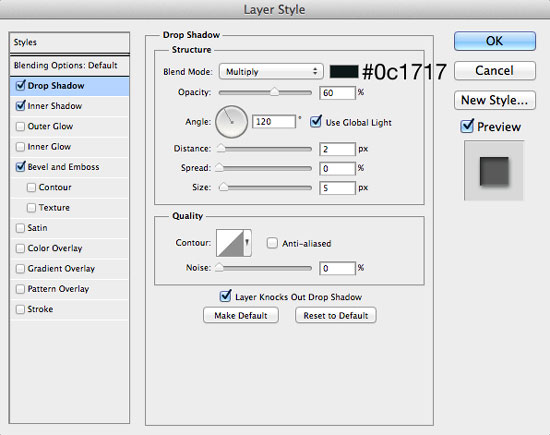
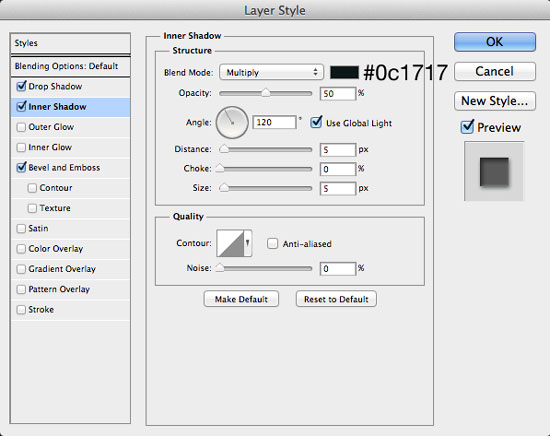
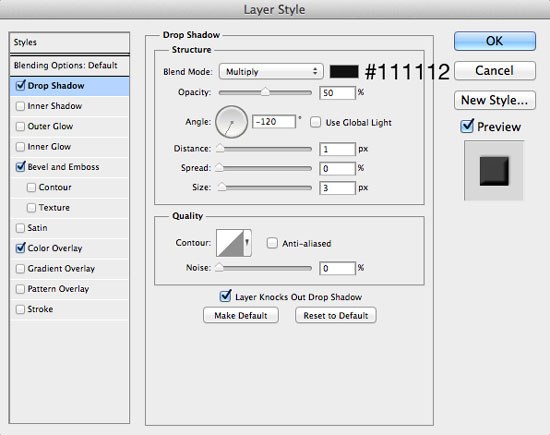
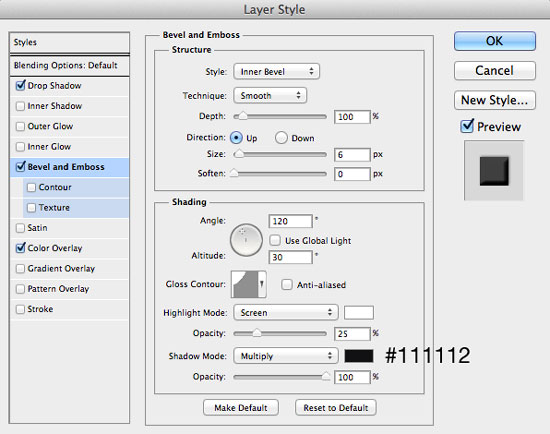
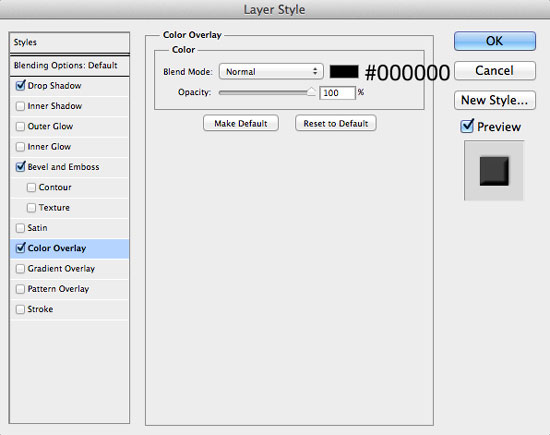
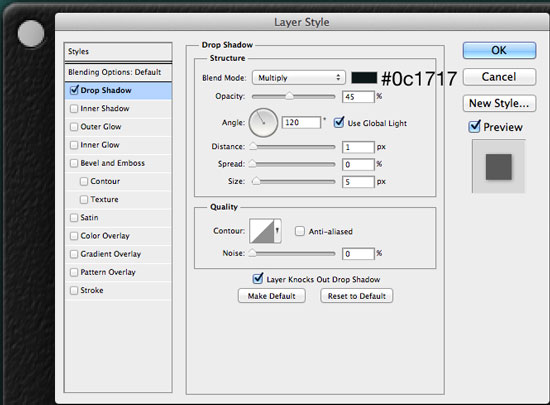
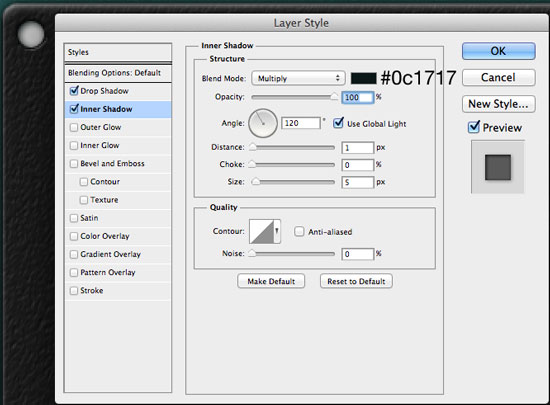
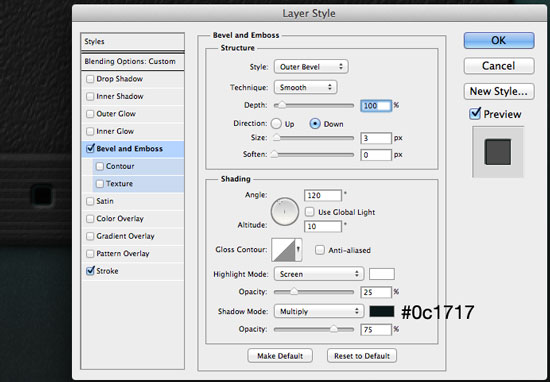
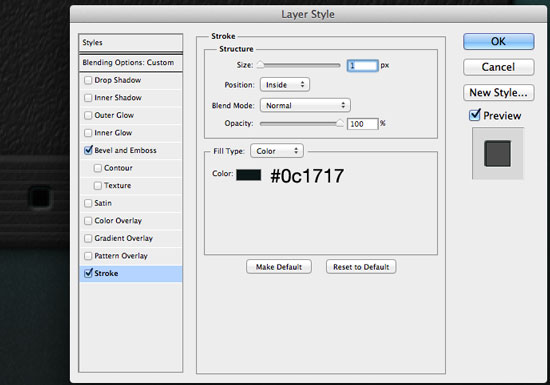
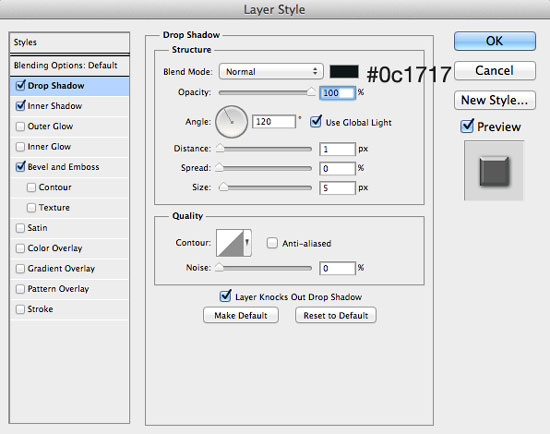
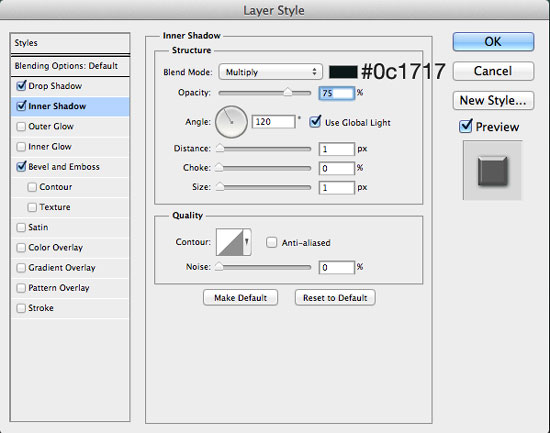
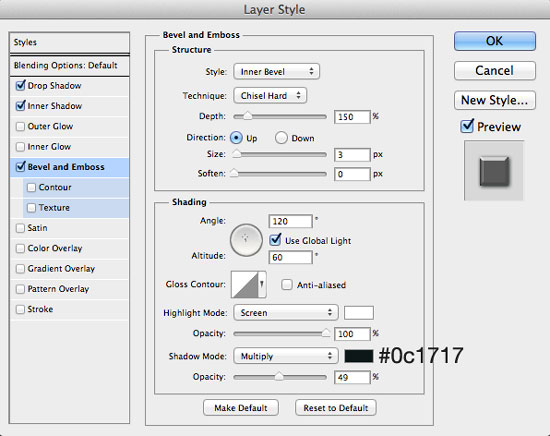
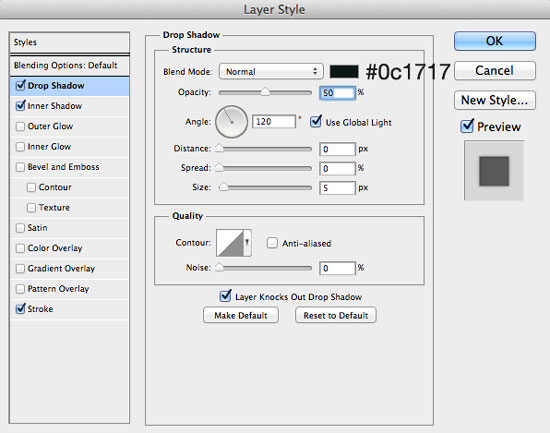
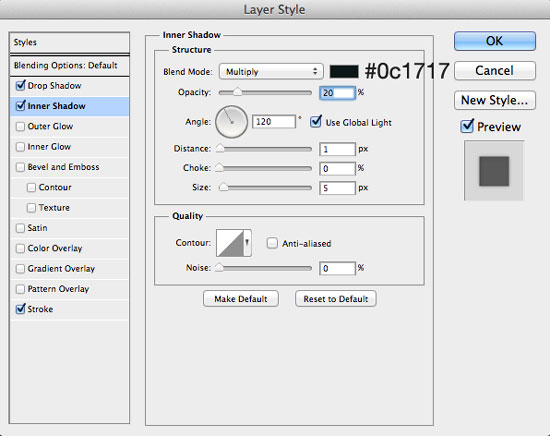
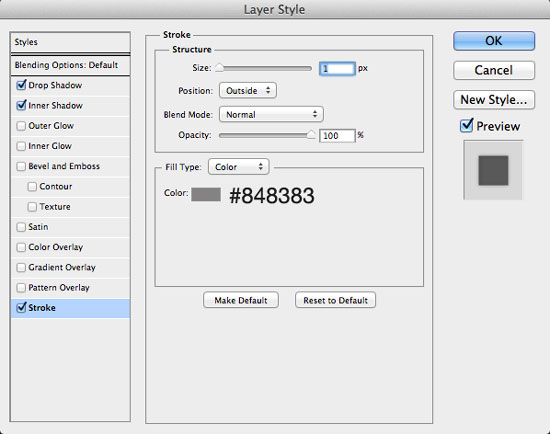
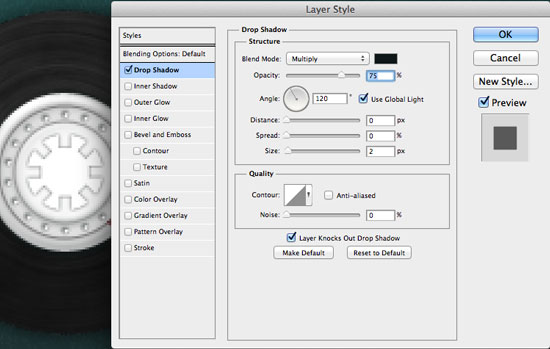
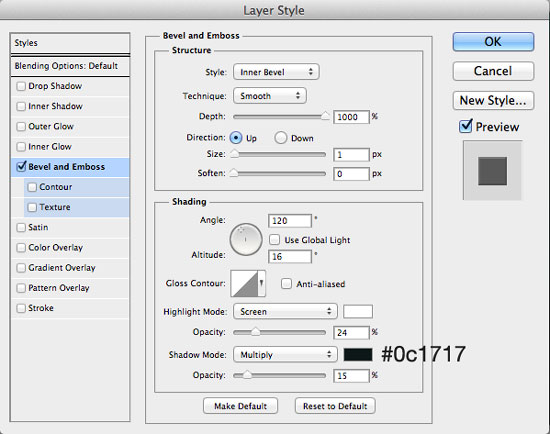
Grab Pen Tool (P), set the color to #191919 and make a shape similar to mine on the left side, below cassette shape layer.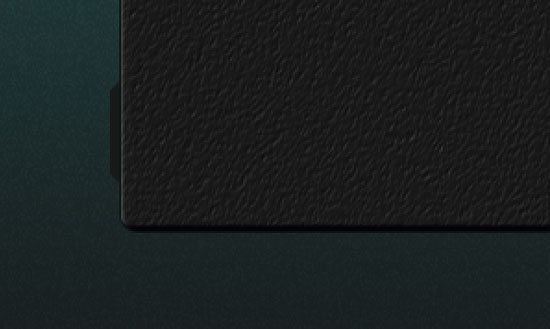 Apply Drop Shadow and Bevel and Emboss.
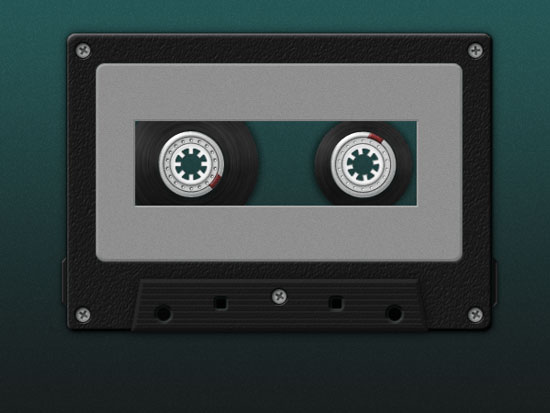
 Duplicate this layer mirroring it to the other side of the cassette and edit Layer Styles.

Step 5
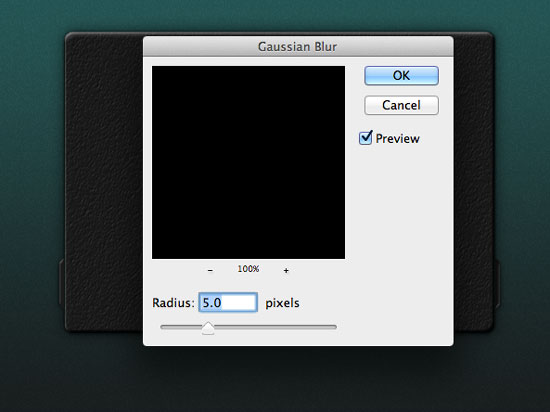
Let's add shadow around cassette shape. Create new layer just above background layer, make selection around cassete shape (Cmd/Ctrl + click on cassette shape Vector Mask thumbnail) and fill it with black color. Next apply Gaussian blur to this layer with radius set to 1.1px and set Opacity to 80%.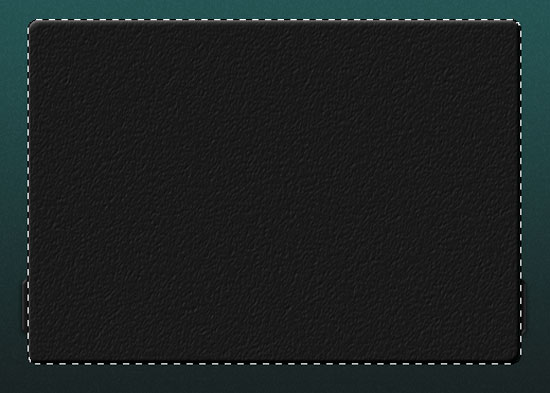
 Duplicate this layer (Cmd/Ctrl + J), apply Gaussian Blur with radius set to 5px and lower the Opacity to 60%.
 Group this two layers in group named "shadow".
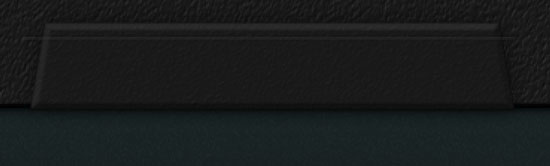
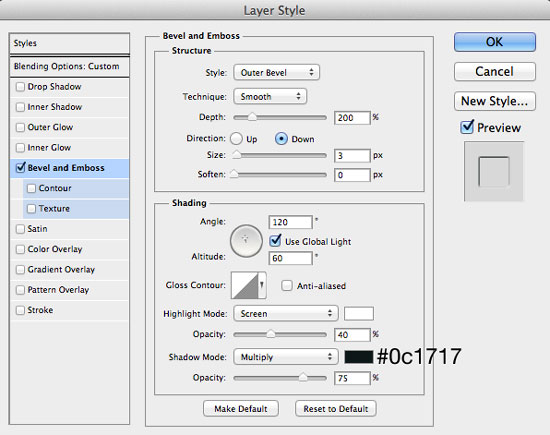
Step 6
Using Pen Tool (P) create shape like on the picture below. For the color use #191919.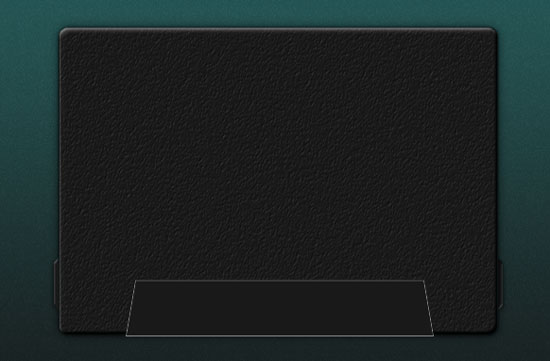 Open Layer Style by double clicking on the layer and add following layer styles:
 Add plastic texture using method explained in Step 3, but this time lower the Opacity to 40%.
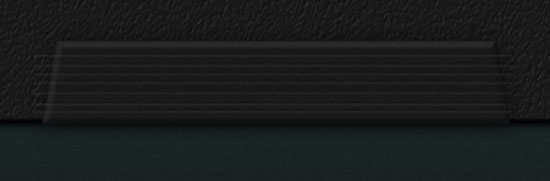
 With Line Tool (U), draw 2px thin line,
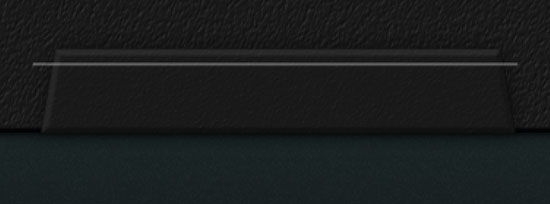 apply following layer styles and set Fill to 0%.
 Duplicate this line couple times until you have something like this.
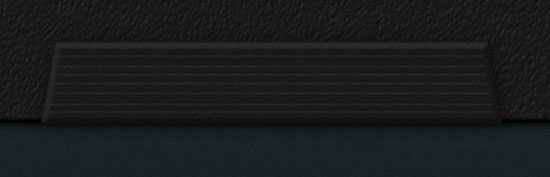
 Select all lines and group them (Cmd/Ctrl + G). Next, create selection around shape we just created in this step (Cmd/Ctrl + click on shape's Vector Mask thumbnail),
 and apply layer mask (Layer > Layer Mask > Reveal Selection) to the group.

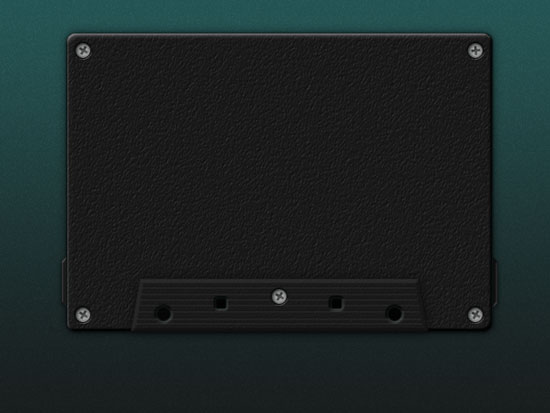
Step 7
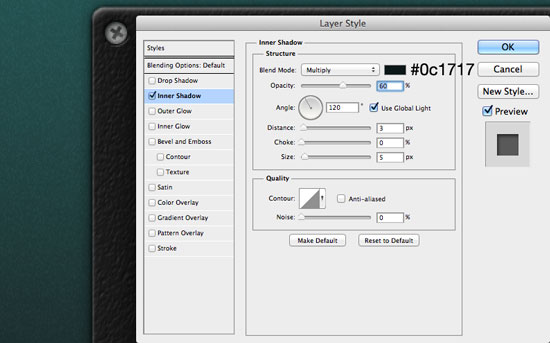
In this step we will add screws. Create new group, name it "screw", and inside group draw small cricle using Ellipse Tool (U). Set Fill to 0% and apply Bevel and Emboss:
 Make another circle, smaller, over this one, again with Ellipse Tool (U), using #bebebe color.
 Open Layer Style, and add following layer styles:
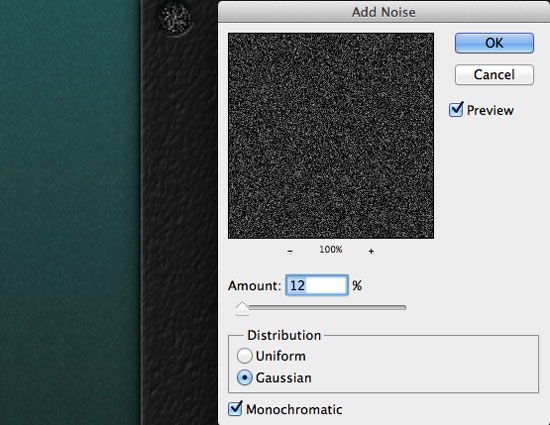
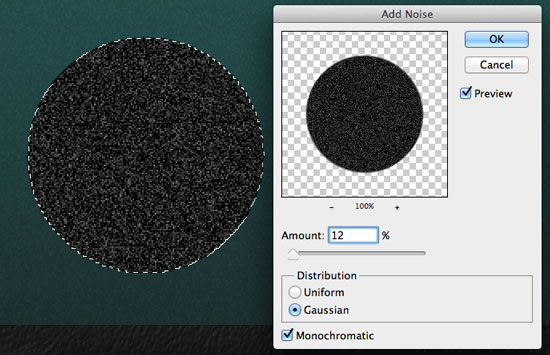
 Create new layer on top, fill it #292929, add Clipping Mask (Layer > Create Clipping Mask), go to Filter > Noise > Add Noise. Set Amount to 12%, Distribution to Gaussian and thick Monochromatic. Change Blend Mode to Soft Light.
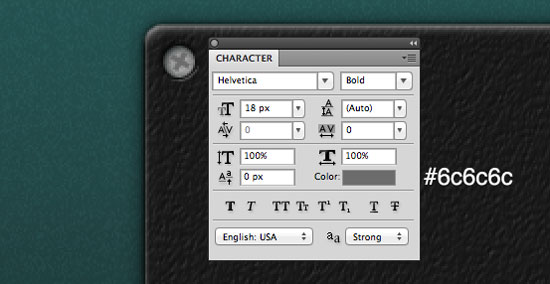
 Select Horizontal Type Tool (T) and using Helvetica as a font make a "+" in the middle of the circle. Apply Inner Shadow from Layer Style.
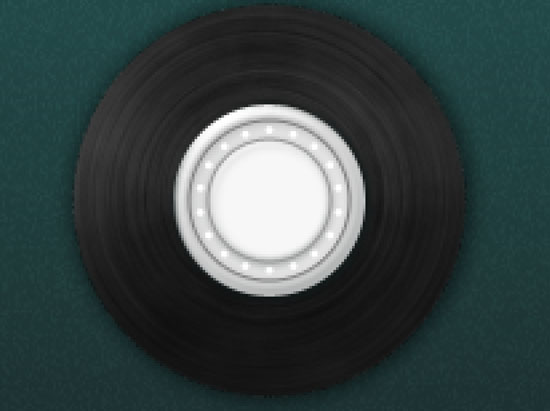
 Duplicate "screw" group 4 more times, and position screws like on the image below.

Step 8
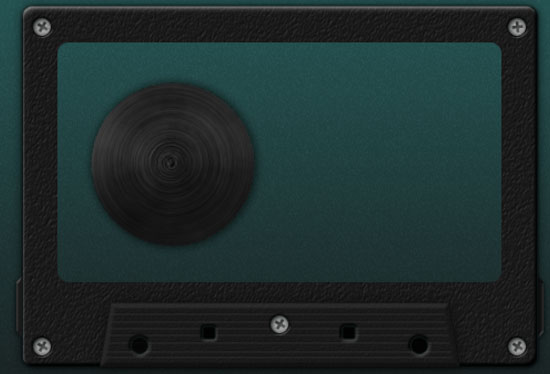
Using Ellipse Tool (U) and Rounded Rectangle Tool (U) (radius set to 2px) add some more details.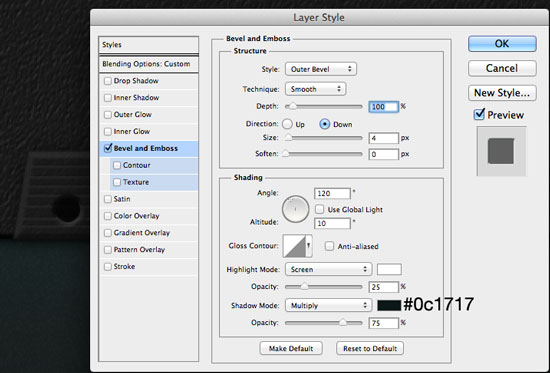
Step 9
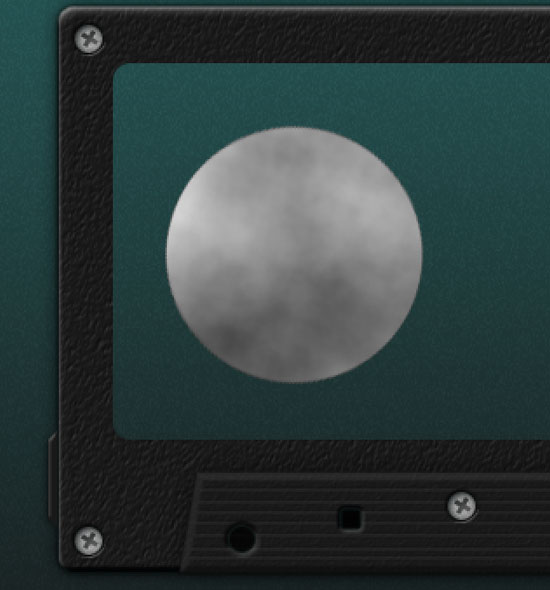
Select all layers, except background layer, and group them (Cmd/Ctrl + G). Name this group "cassette body". Using Rounded Rectangle Tool (U), with Radius set to 7px and color to #8e8e8e draw a rectangle ("label"). Reset Foreground and Background colors to Black and White, and add Noise. (Adding noise will require to rasterize this shape so just click OK when pop up window shows.)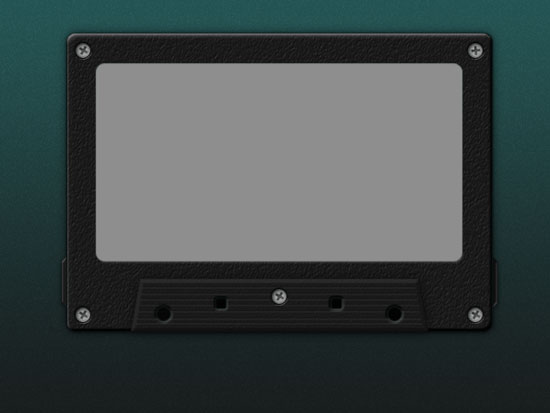
 We're not going to need this layer for now, so hide it by clicking on the eye icon.
Create selection around "label" layer (Cmd/Ctrl + click on layer thumbnail), select "cassette body" group, and go to Layer > Layer Mask > Hide Selection. This will allows us to see the background through the cassette body.
We're not going to need this layer for now, so hide it by clicking on the eye icon.
Create selection around "label" layer (Cmd/Ctrl + click on layer thumbnail), select "cassette body" group, and go to Layer > Layer Mask > Hide Selection. This will allows us to see the background through the cassette body.
Step 10
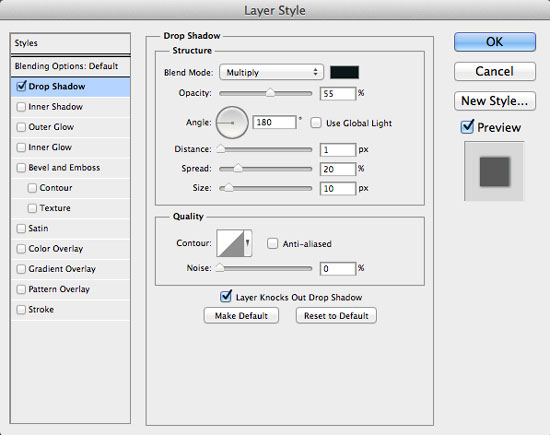
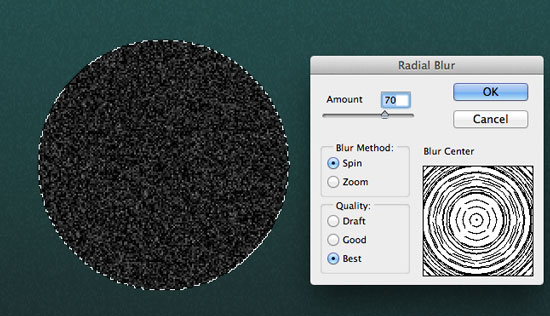
Create new group "left tape", be sure that "label" layer (although is invisible) is on top, then create new layer inside "left tape" group. Use Elliptical Marquee Tool (M) to create circle and fill it with #1d1d1d color. Apply Drop Shadow.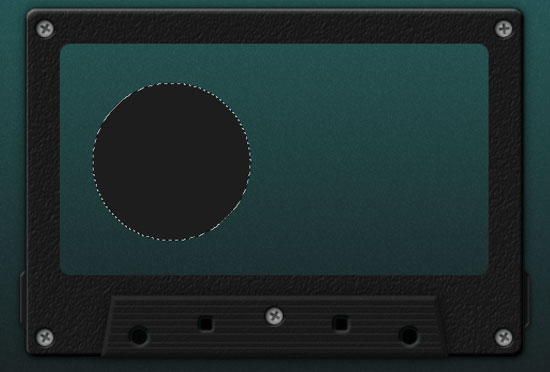
 Add Noise and Radial Blur.
 Don't clear the selection yet. Create new layer, render clouds (Filter > Render > Clouds), and change the Blend Mode to Soft Light.
Step 11
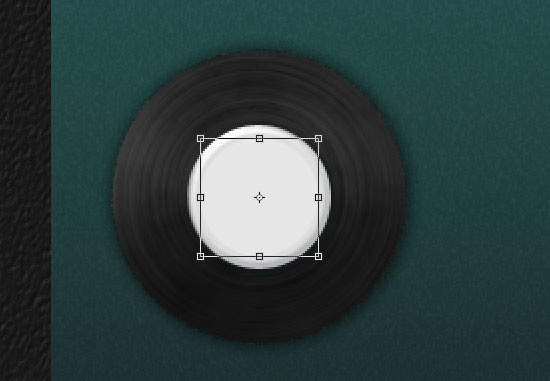
Create new cricle over the tape shape, using Ellipse Tool (U) and #dddddd. Add layer styles.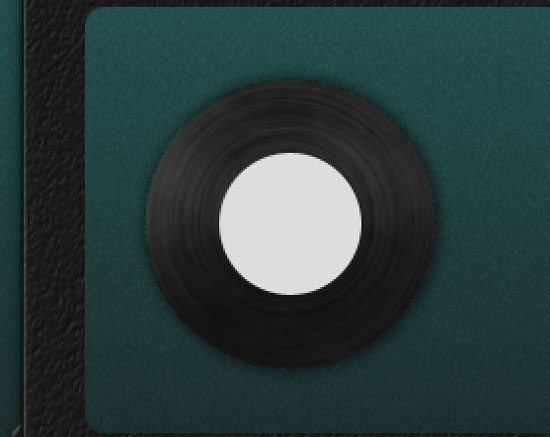
 Add another circle (#e6e6e6), smaller, with following layer styles,
 and another one (#f7f7f7).

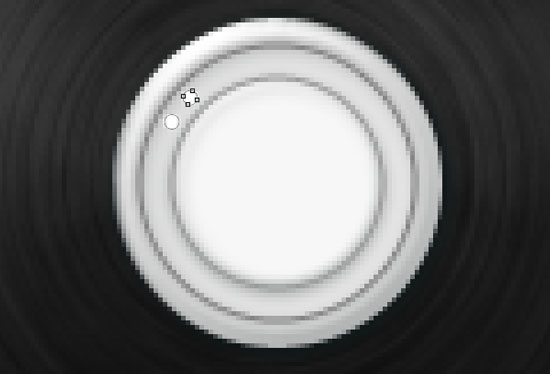
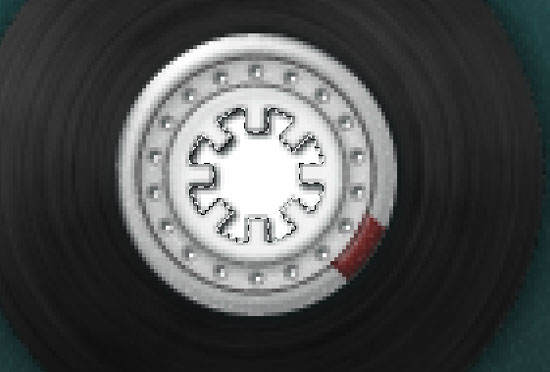
Step 12
We will add the dots to the tape roll now. Zoom close enough (500%), so you can see what you are doing. Draw small cirlce (#ffffff) using Ellipse Tool (U). Select its path, hit Cmd/Ctrl + Alt + T. Hold Alt and move transformation pivot (crosshairs in the middle of transformation box) to the middle of the tape. Shift + drag to rotate dot 15 degrees. Repeat this until you have something like this.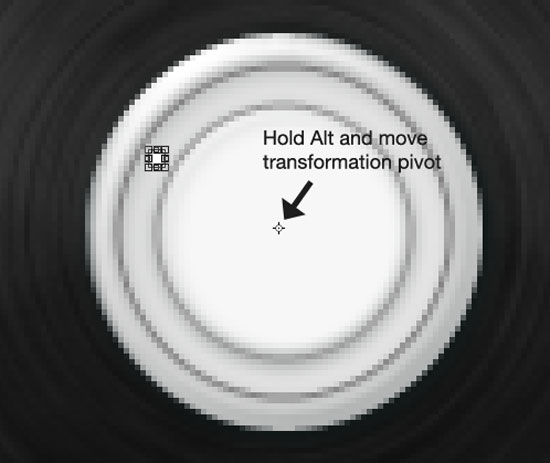
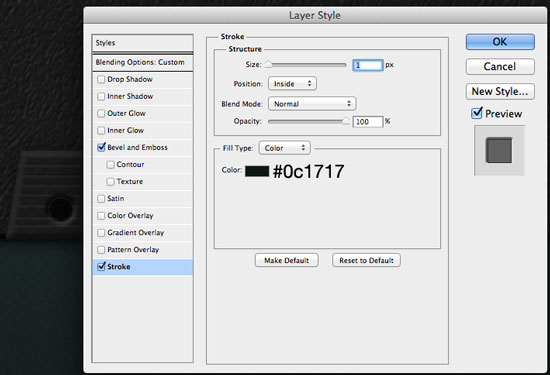
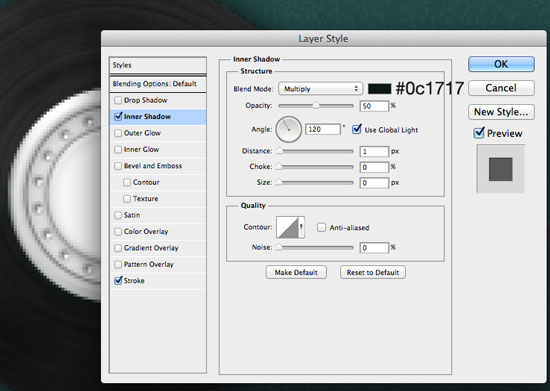
 Apply Inner Shadow and Stroke form Layer Style panel.
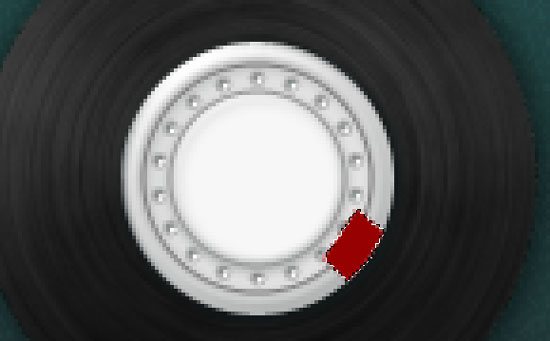
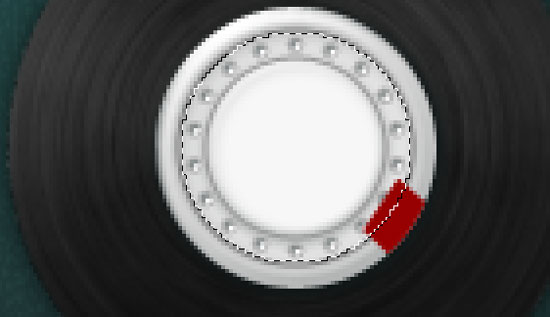
 Pick up Ploygonal Lasso Tool (L), and create selection like on the image below. Create new layer and fill selection with #970000 color.
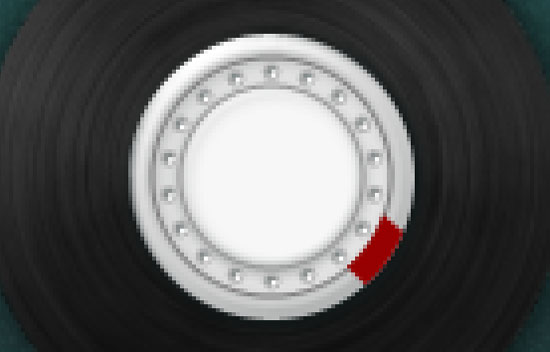
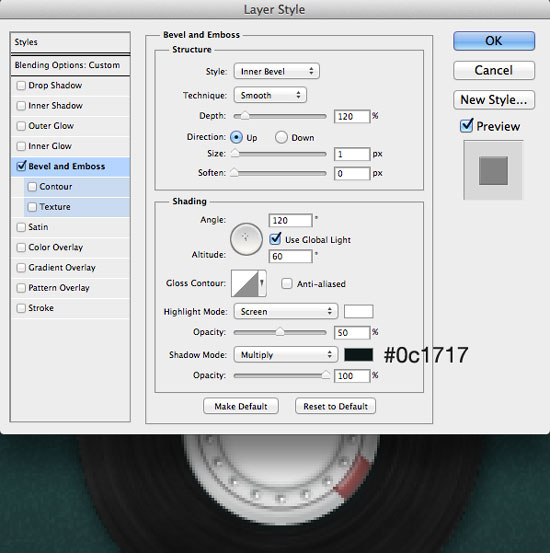
 Next, make selection around inner circle (second), and apply Layer mask to red layer (Layer > Layer Mask > Hide Selection). Apply Bevel and Emboss. Set the Blend Mode to Multiply and Opacity to 60%.
Step 13
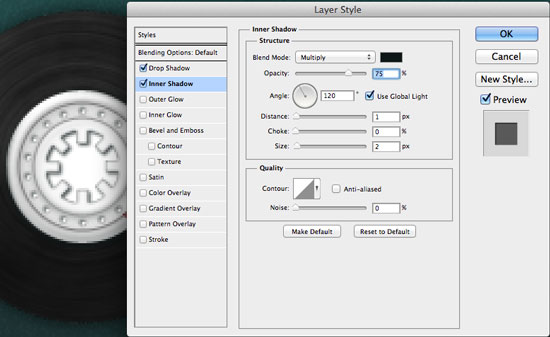
With Pen Tool (P), set to Paths, create selection like the one on the image below. Create new layer, fill with white, and apply layer Styles.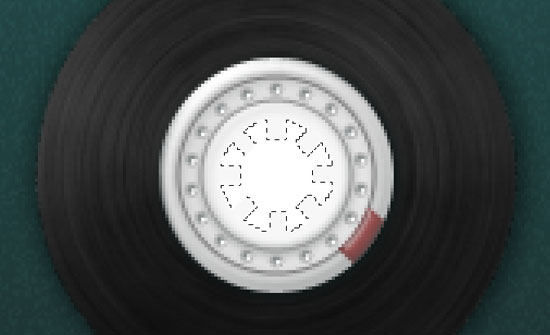
 Add another new layer, create selection around the biggest inner circle, fill selection with #1d1d1d color, add Noise (Amaount: 8%, Gaussian, Monochromatic), and finally change Blend Mode to Soft Light and Opacity to 80%.
 Finally make selection around gears, select "left tape" group, and go to Layer > Layer Mask > Hide Selection.

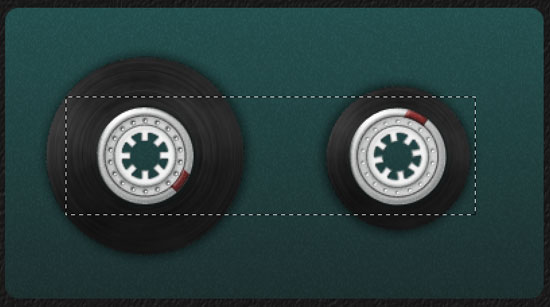
Step 14
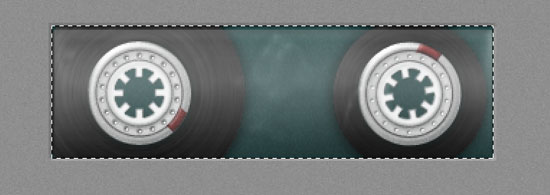
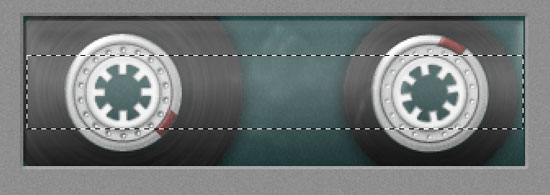
Duplicate "left tape" group, rename to "right tape" and move to the right. Rotate a bit and make tape smaller. Use image below as reference.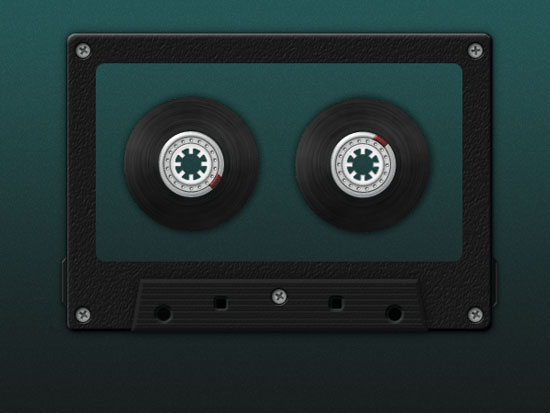
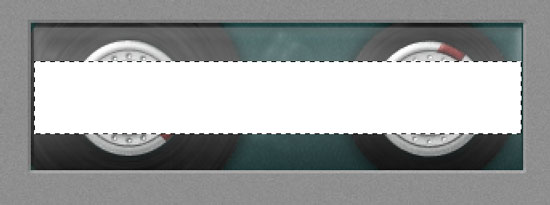
 Grab Rectangular Marquee Tool (M) and draw selection like on the image below.
Step 15
Remeber the "label" layer, the one on top, hidden one? Make it visible again, then go Layer > Layer Mask > Hide Selection.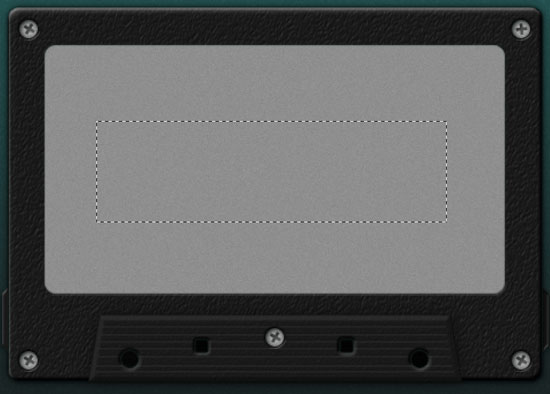
 Open Layer Style panel and apply Bevel and Emboss.
 With Recatngular Marquee Tool (M) draw selection, create new layer on top, make sure the Foreground color is white, invoke Gradient Tool (G) and draw Foreground to Transparent gradient. Lower the Fill to 10% and apply layer styles.
Step 16
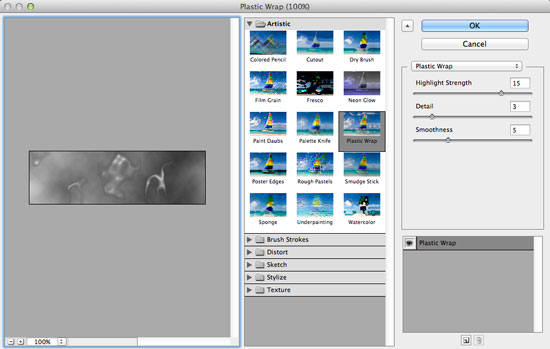
Don't clear the selection. Create new layer on top and render Clouds (Filter > Render > Clouds). Go to Filter > Artistic > Plastic Wrap and apply filter. At the end change Blend Mode to Soft Light and Opacity to 40%.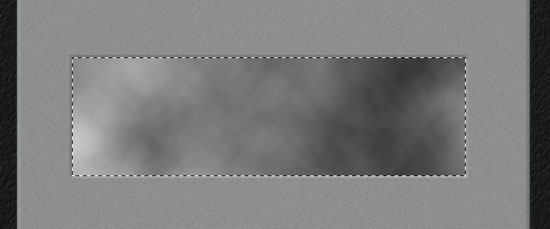
 Create new layer, use Rectangular Marquee Tool (M) to make new selection, fill it with white, set Fill to 0%, and apply Layer Styles. Use images below as reference.

Step 17
Grab Polygonal Lasso Tool (L), create selection like on the image below, set Foreground color to white and draw Foreground to Transparent gradient. Change Blend Mode to Soft Light and Opacity to 40%. Create couple of this light streaks, play with size and opacity.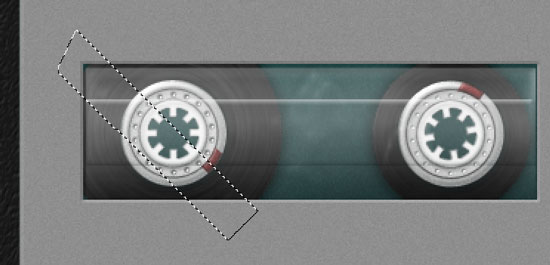
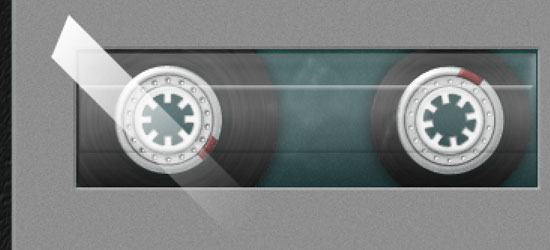
 Select all light streaks and place them into a group (Cmd/Ctrl + G). Pick up Rectangular Marque Tool (M), draw selection, then select group and apply Layer Mask (Layer > Layer Mask > Reveal Selection).
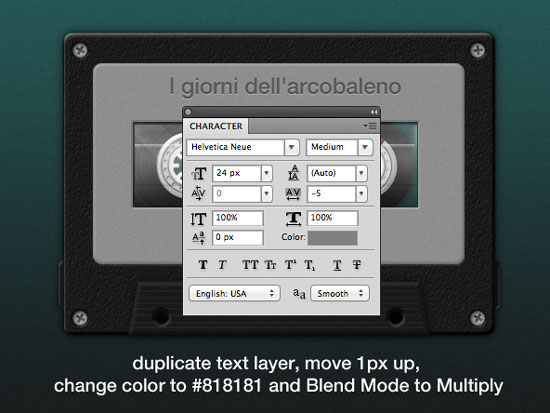
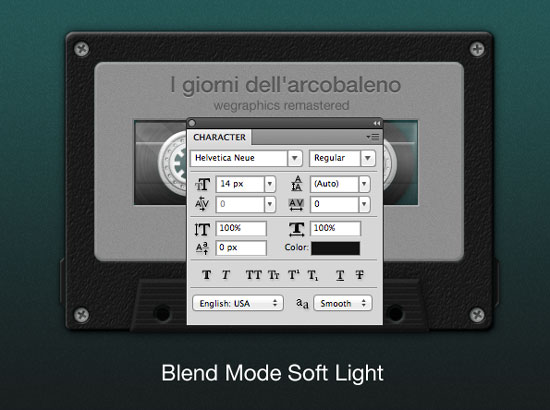
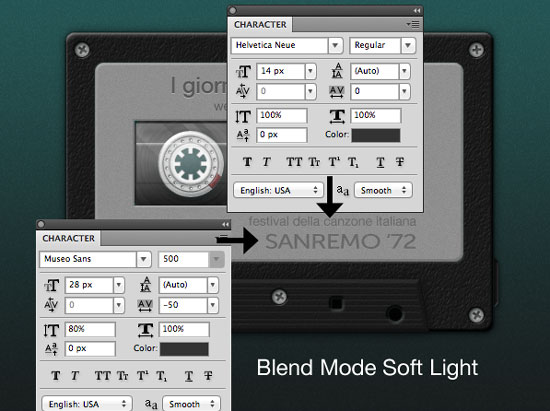
Step 18
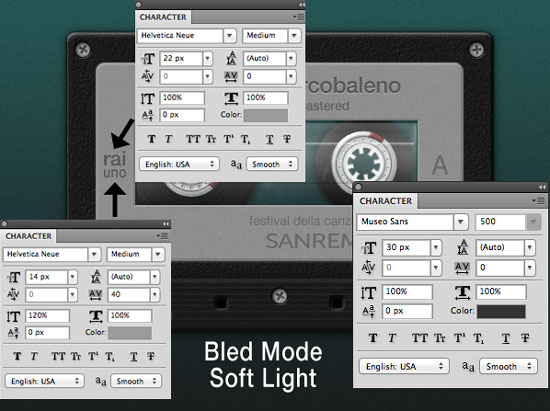
It's time to add some text to cassette label. Use images below as reference. Please notice that I used Helvetica Neue and Museo Sans fonts. I encourage you to use any font you want and play with colors and layer styles.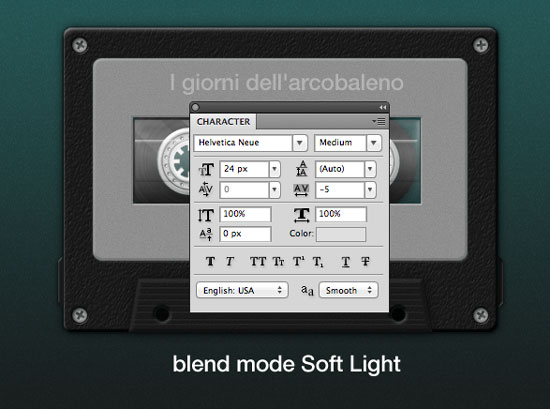
Step 19
This is the last step. We will finish this tutorail by adding reflection. Select all layers, except background layer, duplicate and then merge duplicated layers. Drag this resulting layer just above background layer, Flip Vertical and lower Opacity to 50%.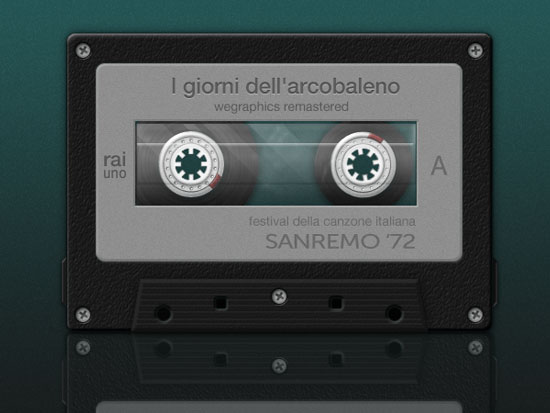 Add Layer Mask to reflection layer, set Foreground color to black, and draw few Foreground to Transparent gradients to mask out the bottom part of reflection. That's it, we're done!
More from Tutorials

How to Easily Remove Smoke From The Background in Photoshop
Tutorialsby Diego Sanchez
Smoke images can be used in a wide range of applications across various designs, such as adding drama to a photograph, crafting captivating visual effects on posters, or even giving your artwork a mysterious halo. Whichever the case, transparent smoke can serve as a powerful tool in your arsenal. So today, I will show you how easy it is to remove the background from a smoke image, and in the process, prepare the file to change the smoke color at any time you want, allowing you to seamlessly integrate it into your projects.
Read more
Easily Make a Glass Texture Effect in Photoshop
Tutorialsby Diego Sanchez
The glass effect has been used by many designers and photographers to add depth and dimension to their compositions with a touch of modern elegance. There are, of course, many different ways to apply a glass effect in Photoshop, but today I will show you how easy it is to make your own glass texture and apply realistic distortion to any of your images using nothing but the default Photoshop tools.
Read more
How to Easily Make Your Vector Digital Signature
Tutorialsby Diego Sanchez
In today's digital life, whether you are a freelancer, a business owner, or simply someone who frequently engages in digital transactions, having a well-crafted digital signature is almost indispensable to add a touch of authenticity and credibility to your documents. So today, I will show you how easily you can make your own vector digital signature in Illustrator for you to sign your digital documents or incorporate it into any design work.
Read more
Easily Make an Editable Grunge Text Effect in Photoshop
Tutorialsby Diego Sanchez
There are different ways to make a grunge text effect in Photoshop while keeping your text fully editable, and the most known one is to use a texture as a layer mask to hide part of the text. But Today I will show you a differnt approach on how you can make this kind of effect, while keeping you text fully editable and at the same time give you a bit more control over that effect by using a texture in a new layer (instead of a layer mask) that you can later move, scale, replace or combine with other textures without replacing any kind of layer mask.
Read more