Create an Ice Cream Type Treatment in Photoshop
It's funny to see how simple objects can inspire creative type treatments. In the past I've played with plates, paper and wood. Today I will show you how to realize an awesome text effect using ice cream! The process is simple enough for any level Photoshop lover. We will be dealing with illustration techniques, and will explore the power of layer styles applied to custom brushes. So... give it a try!
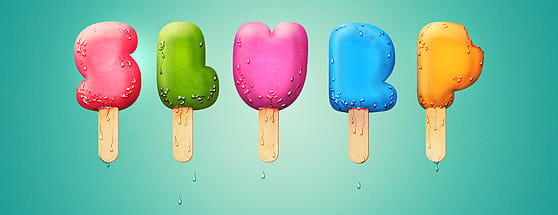
Preview
Click to enlarge

Here is a 100% zoom close up

Step 1
Let's start by creating a new Photoshop document. Mine is 2560x1440 pixels. Fill the background with a color of your choice (it's not important at this stage), and double click on the layer thumb to open the layer styles window.
Here add a gradient (radial) overlay going from #c0e6df to #15a48b, thus overlapping the first fill color.

Step 2
At this point we need to choose the right font for the illustration. If you have more patience, you could try drawing custom letters in Illustrator. Just try to make them bold and a bit irregular. If you're lazy, like me, do a search for the right font: Doughboy, realized by Lucas Sharp, looks perfect!.
Write a word or phrase. A suggestion: type each letter on a separate layer.

Step 3
I will show you how I created the first letter, S. The process for the other letters is the same, so once you've learned how to create your first ice-cream letter, you'll be able to reproduce it infinite times.
Start by rasterizing the type: right-click on the letter thumbnail > rasterize type. Then right-click again and select "Blending options". We will play with layer styles to start giving color and depth to the illustration.
Add a light red (#fd5e74) color overlay.

Select Bevel and Emboss with the following settings and check "contour" to make the 3d effect more evident.

Finally add Satin, set on color dodge, to put in some interesting details.

Step 4
To make the ice-cream/letter more realistic we can use a texture. Download this ice image and merge it into the document (File > Open...), directly above the letter. Press ctrl+T to activate the free transform tool and resize the image.

Set the texture color mode to color burn with opacity 10%

Finally with the texture still selected, ctrl+click over the letter (layer thumbnail) to make a selection of its pixels, and add a layer mask. By doing this you will remove the texture areas that exceed the letter.
To add a layer mask simply click the "add layer mask" button which is at the bottom of the layer window.

Step 5
Select both the texture and letter layers and press alt+ctrl+E to merge them into a new layer. We will use this image from now on, feel free to hide the 2 original layers.
Now let's add a noise effect. Make sure to have white and black as foreground and background color, then create a new layer and fill it with black. Go to Filter > Noise > Add Noise...

Add a layer mask, as shown in step 4, so the noise effect will affect only the area covered by the letter:

Set the layer to screen to remove the black area, and reduce the opacity to around 30% to make the effect subtle.

Step 6
Let's create the stick. Draw the main shape with the rounded rectangle tool (radius 30px).

Add a light brown (#f4d0b0) color overlay, then rasterize the layer.

With the Rectangular Marquee tool, select the top area of the shape and hit delete. Then ctrl+D to deselect.

Duplicate the shape layer by pressing ctrl+J. Then move the shape which is below a couple of pixel to the bottom-right. Switch its color to a darker brown (#d68f61).

Step 7
With the same technique used in step 4 and 5, let's apply a wooden texture to the stick. Download our wooden textures and pick up a photo of your choice. Then merge it into the document.
Set the layer blend mode to overlay to see how it will affect the stick.

Reduce the opacity to around 60%, and add a layer mask to remove the area that exceeds the stick.
(To select both the shapes of the sticks, ctrl+click on the first shape, then hold down shift and click on the second one).

Select the texture layer and the two shapes of the stick from the layers window, then merge them into a new layer (alt+ctrl+E) and hide the original layers.
With the pen tool in path mode, create a path that covers a small top area of the stick that we will remove later. The purpose of this step is to make the stick less "rigid".

Press ctrl+enter to activate the selection and hit delete.

Step 8
Using the Burn and Dodge tools, make darker and brighter areas of the ice cream main body. From the screenshot below you can see how I darkened the area behind the stick:

Apply the burn tool again, this time over the top of the stick. Based on the direction of the light source, this area should look darker.

Step 9
A light effect can help to enhance some texture details and make the frozen effect over the ice-cream look more realistic. So create a new group and set its blending mode to color dodge. Create a layer inside the group, grab a large, soft (hardness 0%), white brush and click once over the ice-cream. Reduce the opacity, if the effect is too strong.
Here is my outcome.

Step 10
Here comes the fun part! We will create drops and ice pieces with the use of layer styles. My first thought was to use stock images of drops and water, and play with their blending options to add the drops to the scene. However, after several attempts I decided to proceed with brushes and layer styles, thanks to the help of our great illustrator Diego. The result is more than satisfactory!
Create a new layer and grab a small round brush with hardness 100%. Then paint a spot over the ice-cream.

Double-click on the drop layer to open the style window. Reduce the fill opacity to 0%.

Add bevel and emboss. This will give depth to the drop:

Add a drop shadow and inner shadow.


Finally add inner glow and satin as the last touches:


Step 11
Now that you have the layer set up, just paint! I've created this screencast so you can see my process to realize the drops (with the help of my Wacom tablet).
Ice cream drops in Photoshop from wegraphics on Vimeo.
Step 12
Here is the first letter complete:

Now create a new layer and paint the shadow effect with a soft black brush. Reduce the opacity so the result will look softer. Finally, use the same brush to create the drops on the floor.

The last touch: to increase the contrasts, just add a new gradient map layer (Layer > New Adjustment Layer > Gradient map). Add a gradient going from red (#ee202e) to blue (#002874) to yellow (#f9e600). Set the layer to overlay with opacity 30%.

Now that you know how to create a letter, you can apply it to the entire word or phrase. Exercise your creativity and play with different forms and colors.
The ice-cream is now complete! Are you hungry???
More from Tutorials

How to Easily Remove Smoke From The Background in Photoshop
Tutorialsby Diego Sanchez
Smoke images can be used in a wide range of applications across various designs, such as adding drama to a photograph, crafting captivating visual effects on posters, or even giving your artwork a mysterious halo. Whichever the case, transparent smoke can serve as a powerful tool in your arsenal. So today, I will show you how easy it is to remove the background from a smoke image, and in the process, prepare the file to change the smoke color at any time you want, allowing you to seamlessly integrate it into your projects.
Read more
Easily Make a Glass Texture Effect in Photoshop
Tutorialsby Diego Sanchez
The glass effect has been used by many designers and photographers to add depth and dimension to their compositions with a touch of modern elegance. There are, of course, many different ways to apply a glass effect in Photoshop, but today I will show you how easy it is to make your own glass texture and apply realistic distortion to any of your images using nothing but the default Photoshop tools.
Read more
How to Easily Make Your Vector Digital Signature
Tutorialsby Diego Sanchez
In today's digital life, whether you are a freelancer, a business owner, or simply someone who frequently engages in digital transactions, having a well-crafted digital signature is almost indispensable to add a touch of authenticity and credibility to your documents. So today, I will show you how easily you can make your own vector digital signature in Illustrator for you to sign your digital documents or incorporate it into any design work.
Read more
Easily Make an Editable Grunge Text Effect in Photoshop
Tutorialsby Diego Sanchez
There are different ways to make a grunge text effect in Photoshop while keeping your text fully editable, and the most known one is to use a texture as a layer mask to hide part of the text. But Today I will show you a differnt approach on how you can make this kind of effect, while keeping you text fully editable and at the same time give you a bit more control over that effect by using a texture in a new layer (instead of a layer mask) that you can later move, scale, replace or combine with other textures without replacing any kind of layer mask.
Read more