Create a Vintage Type Design Using Envelope Distort in Adobe Illustrator
Step 1 - Choosing the Right Vectors and Fonts
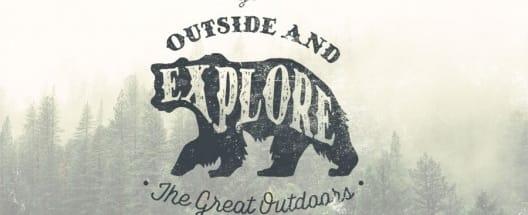
So much of this look is based on the right vector and font selection. There are plenty of fonts available at MediaLoot or here at WeGraphics and around the web. Same goes for vectors, or you can always draw your own as I've done for this tutorial. I chose a bear since I plan for this design to have an outdoor/forest theme. My font is also hand drawn and fits the theme nicely.

Step 2 - Applying the Envelope Distort
In Illustrator, I placed the text over the bear and lined the "E" up over the bear's head. With the text selected choose Object | Envelope Distort | Make with Warp. Set everything to zero and click okay.
 Using the Direct Selection Tool (A), you can grab the points around the text and begin moving and bending the letters around the shape of the bear.

 Once you have the text the way you want it, click Object | Expand to convert the warped text to a shape. Now you can punch the text shape out of the bear. With the text selected, click Object | Compound Path | Make. Now select both the text shape and the bear and click the Minus Front button on the Pathfinder panel.

Step 3 - Adding Additional Text and Effects
Next up, let's add some supporting text to complete our badge design. Using the Ellipse Tool (L) draw a large circle around the bear with no fill or stroke. Now using the Type on a Path Tool, click the circle and type some text that will bend around the bear shape. I added "Go" above the circle type using a secondary script font that I also hand drew. I also added a couple of small circles on either side of the word.
 Below the bear I added some more type to complete the full sentence that occurs throughout the design. I used the script font as the word "Go" to tie it all together. I also warped the text slightly using Effect | Warp | Arc.

Step 4 - Over in Photoshop
Now that we have our completed badge, let's jump over to Photoshop to add some background elements and more texture. Create a new document in PS, mine is 1050x700. For the background I chose this incredible forest photo from Unsplash. Add a Color Fill adjustment layer above the photo and use #fef8f5 for the color. Reduce it's opacity to 55%.
 Back over in Illustrator select all of the badge design and copy (Ctrl+C) and the move back to PS and paste (Ctrl+V) the badge to our new document. Select "Paste as: Pixels" from the dialog box that appears.

Step 5 - Finishing Up
To wrap things up, let's add a texture scuff it up a bit. I grabbed this black texture, and placed it on a layer above all others. The blend mode for this texture layer should be set to Screen so that only the white portion shows through. Finally, I added a Gradient Map adjustment layer to blend the colors of the entire piece a bit better. I used a gradient of blue #0a2f59 to yellow #ffefa5. I set the opacity of this layer to 50%.
 I hope this tutorial showed you how easy it is to create a vintage typographic design using Envelope Distort in Illustrator. I'd love to see your results! Feel free to share them using the comment fields below.
More from Tutorials

How to Easily Remove Smoke From The Background in Photoshop
Tutorialsby Diego Sanchez
Smoke images can be used in a wide range of applications across various designs, such as adding drama to a photograph, crafting captivating visual effects on posters, or even giving your artwork a mysterious halo. Whichever the case, transparent smoke can serve as a powerful tool in your arsenal. So today, I will show you how easy it is to remove the background from a smoke image, and in the process, prepare the file to change the smoke color at any time you want, allowing you to seamlessly integrate it into your projects.
Read more
Easily Make a Glass Texture Effect in Photoshop
Tutorialsby Diego Sanchez
The glass effect has been used by many designers and photographers to add depth and dimension to their compositions with a touch of modern elegance. There are, of course, many different ways to apply a glass effect in Photoshop, but today I will show you how easy it is to make your own glass texture and apply realistic distortion to any of your images using nothing but the default Photoshop tools.
Read more
How to Easily Make Your Vector Digital Signature
Tutorialsby Diego Sanchez
In today's digital life, whether you are a freelancer, a business owner, or simply someone who frequently engages in digital transactions, having a well-crafted digital signature is almost indispensable to add a touch of authenticity and credibility to your documents. So today, I will show you how easily you can make your own vector digital signature in Illustrator for you to sign your digital documents or incorporate it into any design work.
Read more
Easily Make an Editable Grunge Text Effect in Photoshop
Tutorialsby Diego Sanchez
There are different ways to make a grunge text effect in Photoshop while keeping your text fully editable, and the most known one is to use a texture as a layer mask to hide part of the text. But Today I will show you a differnt approach on how you can make this kind of effect, while keeping you text fully editable and at the same time give you a bit more control over that effect by using a texture in a new layer (instead of a layer mask) that you can later move, scale, replace or combine with other textures without replacing any kind of layer mask.
Read more