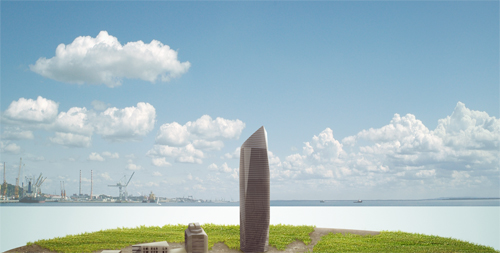
Create a Lost Fantasy Micro World with Powerful Photo Manipulation Techniques in Photoshop
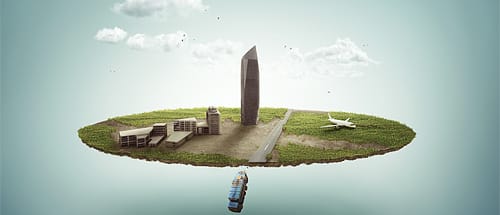
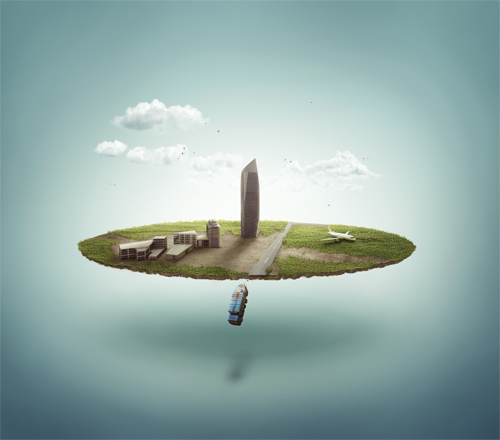
Preview
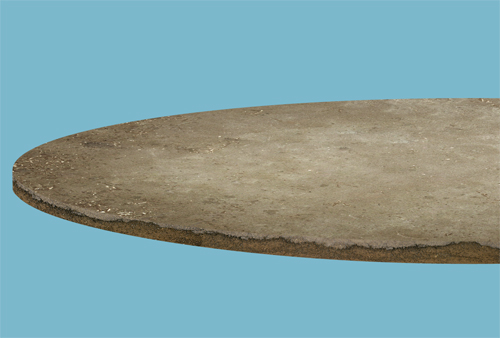
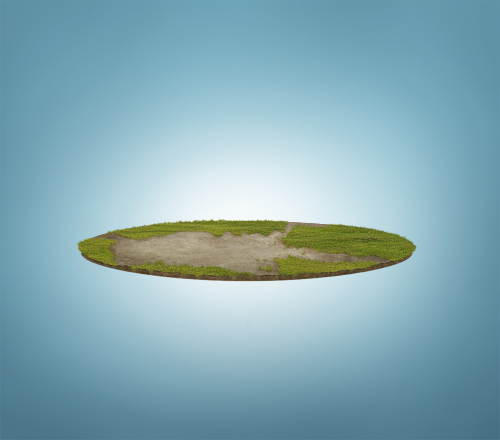
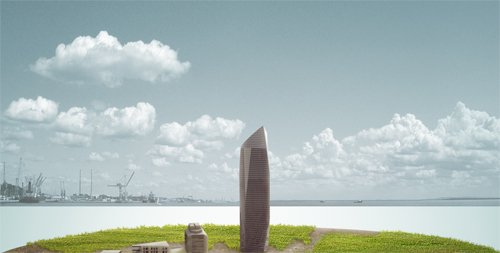
 Detail
Share your tutorial results on our facebook page! The work with the most likes will win a Premium WeGraphics Account. If you are already a member, you will win $14 in cash (2 months of premium membership).
Step 1
Let's start by creating a new document of dimensions around 1500x1300px. It's always good to make your projects little bit bigger than they will be in the final release, this makes the overall detail better. Now in the Layers Palette add the first adjustment layer - Solid Color, and choose #7cb8cc for the color. Name it "background color". Grab Ellipse Tool (U) and draw an ellipse in the center of the design (make sure it's set to Shape Layers). And use the color #4e412d to fill it in. Name this layer "top".
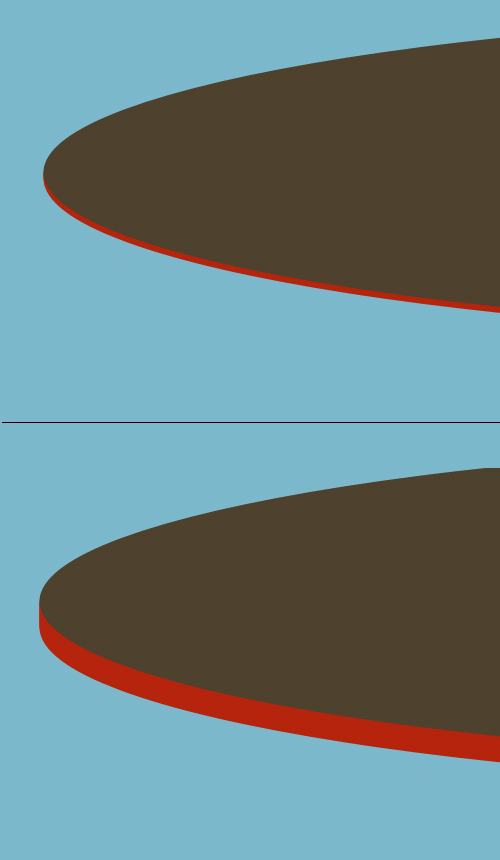
 Duplicate that ellipse layer. Now select the original ellipse layer below this duplicate and change it's color to red. Next grab the Move Tool (V) and hit Alt+Down Arrow Key 10 or 20 times to make moving copies of the layer. This will allow you to create a nice 3D look of the shape. Then merge all red shapes using Ctrl+E and name the merged layer "bottom".
Step 2
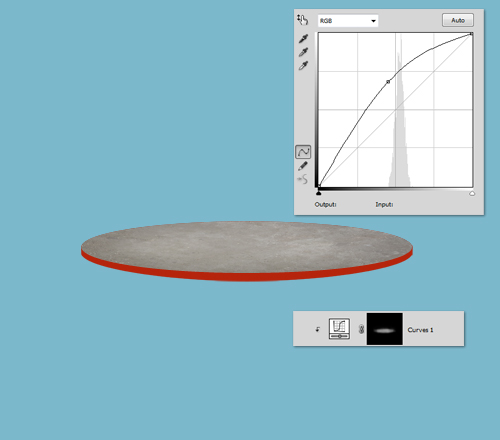
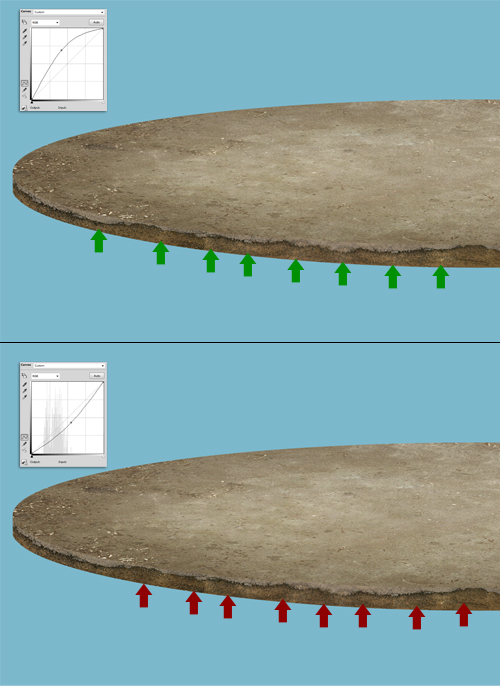
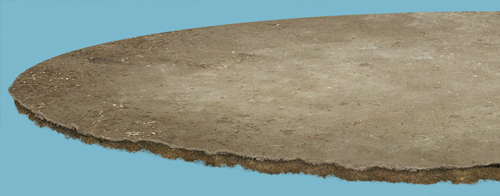
Now download one of these concrete textures and drag it to the project. Place it above the "top" layer and hit Ctrl+Alt+G to use a Clipping Mask. Then you can use Ctrl+T > Distort and adjust the right perspective of this texture, as this will be our ground.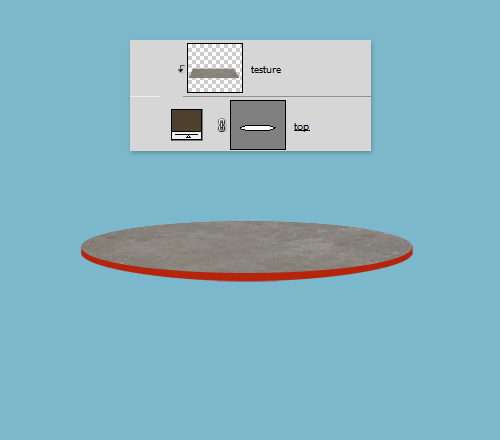 Create another adjustment layer above the texture - Curves. Hit Ctrl+Alt+G for Clipping Mask. Delete the visible Layer Mask and go to Layer > Layer Mask > Hide All. Adjust the curve as shown below and use a soft white brush to paint on the mask. Paint in the middle of our ground to give it some character.
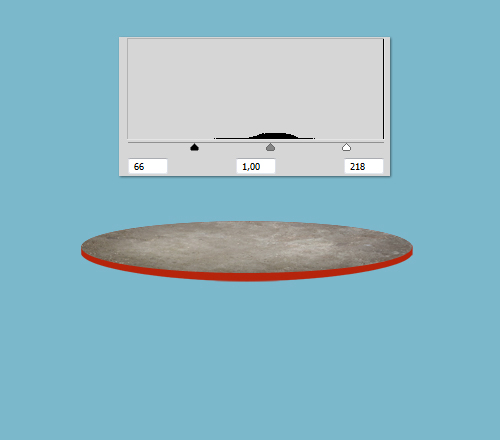
 Next add another adjustment layer - Levels. Hit Ctrl+Alt+G for Clipping Mask. To darken the texture use the values from the image below.
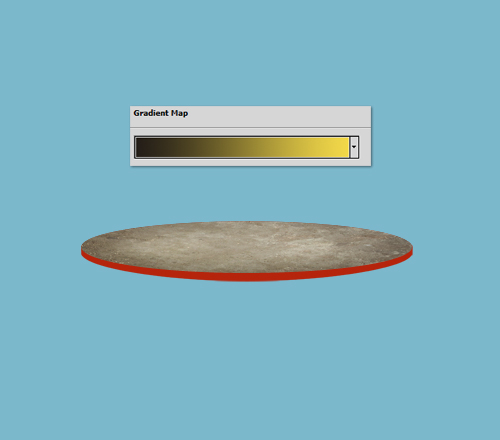
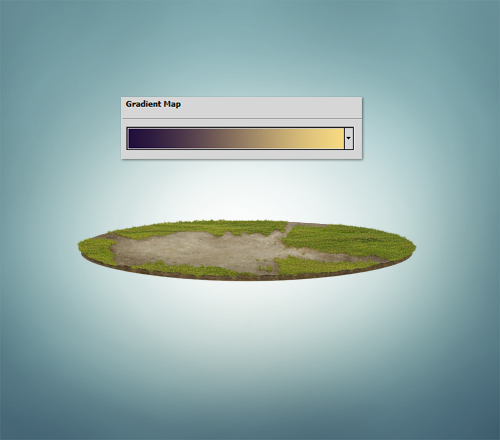
 Next, add a Gradient Map using colors from #231d18 to #f3d949. Use Ctrl+Alt+G for the Clipping Mask. Set the layer Blending Mode to Soft Light and the Opacity to 20-30%. Finally, you can also add Color Balance and make the yellows a little bit deeper.
Step 3
Next, open one of these textures and drag it to your project. Place it exactly above the "bottom" layer, hit Ctrl+Alt+G to use Clipping Mask.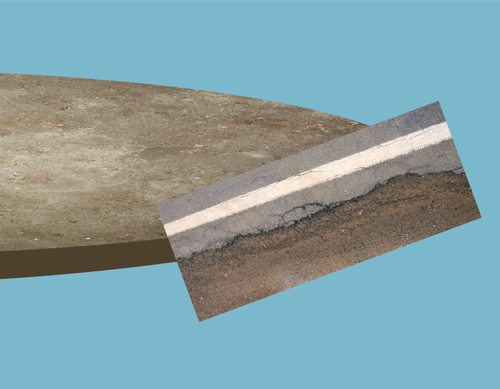 The texture should automatically jump "into" the layer as you can see below. Then just use Ctrl+T > Wrap to give the desired shape of our ground edge.
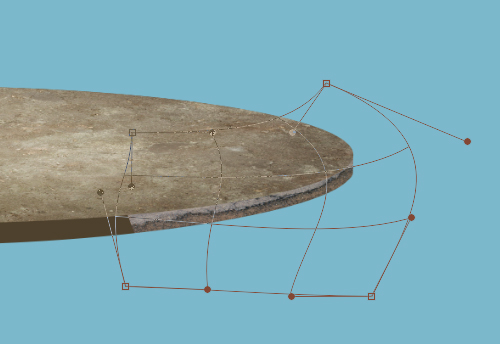 Continue adding this textures to the "bottom" layer, for each piece use a Clipping Mask. Not every texture will fit the previous one. You'll need to use the Eraser Tool or Clone Stamp to make the proper connections.
Step 4
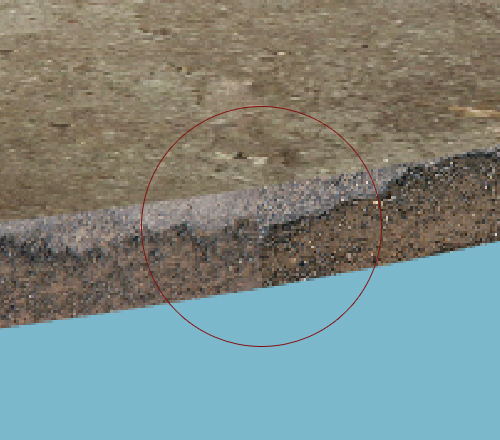
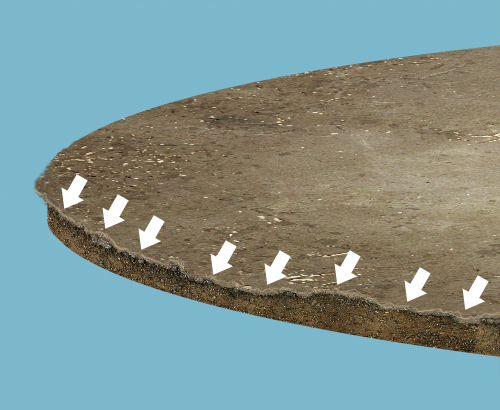
OK, this is how the ground edges should look like after you're done.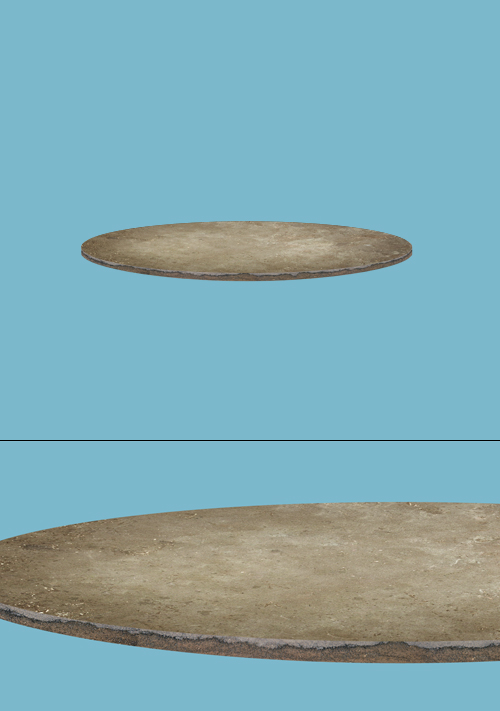 If you're done adjusting the edge shape, now it's time for some color and depth adjustment. Select the last edge-texture layer you created (the one on the top). Then create some adjustment layers:
- Curves: RGB, Output 113 / Input 151 (or just drag the curve a little bit to the bottom right to darken the edge), then turn the Opacity down to 10-20%. When you're done hit Ctrl+Alt+G for Clipping Mask.
- Hue/Stauration: Hue 0, Saturation +6, Lightness -8. Then hit Ctrl+Alt+G for Clipping Mask.
- Color Balance:
Midtones - Cyan/Red +6, Magenta/Green -4, Yellow/Blue -10.
Shadows - Cyan/Red +4, Magenta/Green 0, Yellow/Blue -12. Then hit Ctrl+Alt+G for Clipping Mask.
- Hue/Saturation: Hue 0, Saturation -37, Lightness -25. Lower the Opacity to 15%. Then hit Ctrl+Alt+G for Clipping Mask.
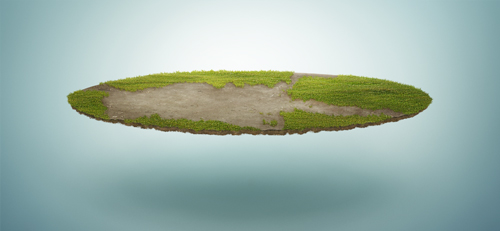
If you have not received a result similar to the one below, try to experiment with the same adjustment layers to achieve something like this.
If you're done adjusting the edge shape, now it's time for some color and depth adjustment. Select the last edge-texture layer you created (the one on the top). Then create some adjustment layers:
- Curves: RGB, Output 113 / Input 151 (or just drag the curve a little bit to the bottom right to darken the edge), then turn the Opacity down to 10-20%. When you're done hit Ctrl+Alt+G for Clipping Mask.
- Hue/Stauration: Hue 0, Saturation +6, Lightness -8. Then hit Ctrl+Alt+G for Clipping Mask.
- Color Balance:
Midtones - Cyan/Red +6, Magenta/Green -4, Yellow/Blue -10.
Shadows - Cyan/Red +4, Magenta/Green 0, Yellow/Blue -12. Then hit Ctrl+Alt+G for Clipping Mask.
- Hue/Saturation: Hue 0, Saturation -37, Lightness -25. Lower the Opacity to 15%. Then hit Ctrl+Alt+G for Clipping Mask.
If you have not received a result similar to the one below, try to experiment with the same adjustment layers to achieve something like this.
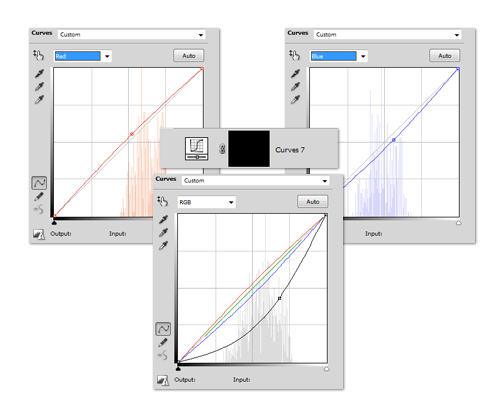
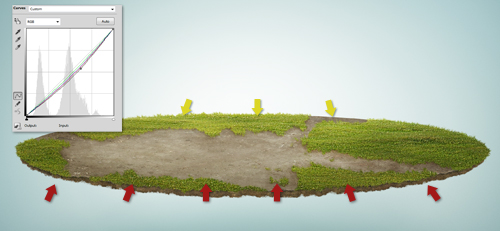
 Make sure you are still in Layers Palette selecting the latest adjustment layer, which was Hue/Saturation. Create a new adjustment layer - Curves, and make sure it's exactly above the Hue/Saturation layer. Hit Ctrl+Alt+G for Clipping Mask. Delete the clean, white Layer Mask from Curves, and go to Layer > Layer Mask > Hide All. Open Curves settings and drag the curve up/left as shown in the first image below. Then using a small, white, soft brush paint on the Curves Layer Mask to reveal the light in spots shown in the first image below.
Following the same process, add another Curves (with Clipping Mask), drag the slider bottom/right, delete Layer Mask and use Layer > Layer Mask > Hide All. Then reveal the dark spots between light ones, shown in the second image below.
The paining you make on layer masks should be vertical straight lines. Don't do it in many different directions as you may screw up the depth effect.
Make sure you are still in Layers Palette selecting the latest adjustment layer, which was Hue/Saturation. Create a new adjustment layer - Curves, and make sure it's exactly above the Hue/Saturation layer. Hit Ctrl+Alt+G for Clipping Mask. Delete the clean, white Layer Mask from Curves, and go to Layer > Layer Mask > Hide All. Open Curves settings and drag the curve up/left as shown in the first image below. Then using a small, white, soft brush paint on the Curves Layer Mask to reveal the light in spots shown in the first image below.
Following the same process, add another Curves (with Clipping Mask), drag the slider bottom/right, delete Layer Mask and use Layer > Layer Mask > Hide All. Then reveal the dark spots between light ones, shown in the second image below.
The paining you make on layer masks should be vertical straight lines. Don't do it in many different directions as you may screw up the depth effect.
Step 5
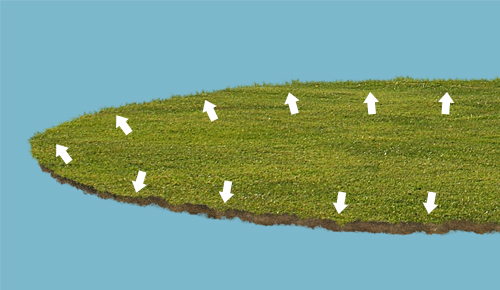
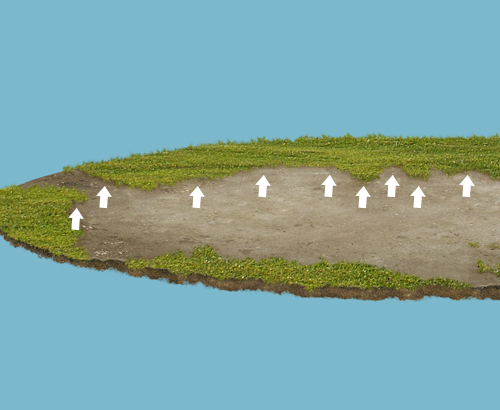
We can now switch for a while to the ground from "top" layer. As you can see below, there are some spots that may need corrections. You don't have to correct it, it's not necessary, as we will further cover the ground with grass. However you never know if covering the whole ground would be a good idea, then what's the point of making this ground (?). So I recommend you fix these places with the Stamp Tool, and soon we will add some grass but only in selected spots making the ground partially visible.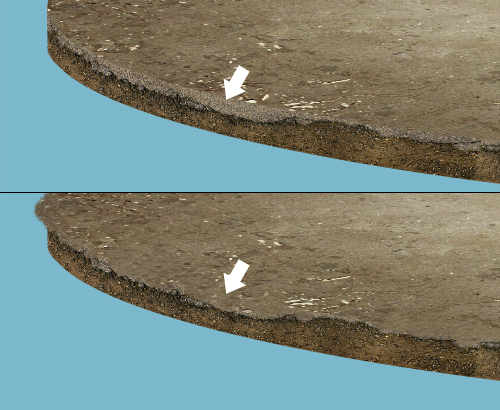 Next, grab 1-2 pixel Brush, Hold Alt (Color Sampler) and sample a light brown color from our ground "top", then release Alt to turn back to Brush. Create a new layer above and paint on the top edge.
Step 6
As some of you know, WeGraphics delivers some fantastic resources that you might find really useful. In this tutorial we're gonna use these brushes to create a "torn" effect. Our ground looks really cool but it still lacks some realism. So you can either merge all the layers connected with the "bottom" layer or just select "bottom" layer and add Layer Mask to it. Then select one of these cool watercolor brushes and paint with black on the Layer Mask. Try to mask the darker bottom spots of the texture.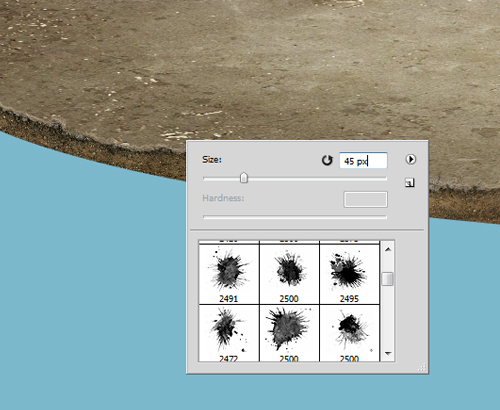 Below is the result of using this brushes.
So you see these brushes are not only great watercolors for some abstract designs, but they can also give you many other great results.
Below is the result of using this brushes.
So you see these brushes are not only great watercolors for some abstract designs, but they can also give you many other great results.
Step 7
Next, bring up this grass photo. Use Ctrl+Click on the "top" layer to call the selection. Then select the grass layer and click on the Layer Mask icon (in Layers Palette). This should mask everything outside the selection.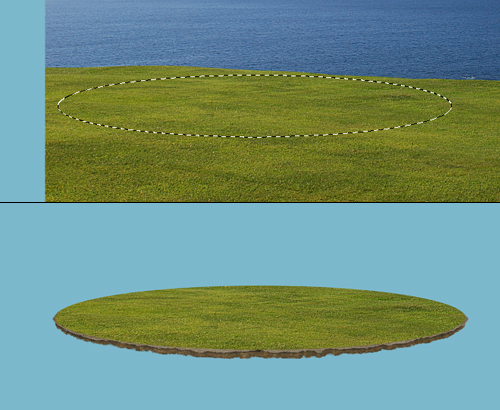 Then repeat Step 6, use the same brushes to reveal some of the grass all around. To do this: select the desired brush, use white color and paint on the Layer Mask.
Step 8
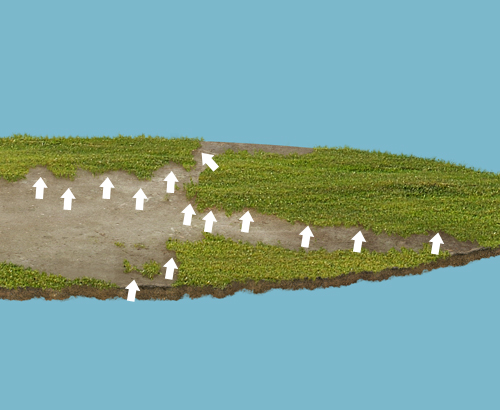
Are you catching up? Great! Now we're gonna use this brush again for shaping up the lawn. Switch to a black color, draw a shape on the lawn's Layer Mask as you see below.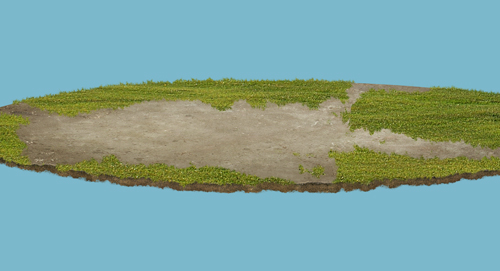 Next add a Curves adjustment layer below lawn layer. Delete the white Layer Mask and go to Layer > Layer Mask > Hide All. Then apply the setting as you see below.
 Now use a regular white, soft, round brush and paint under the grass (on the Layer Mask) to create shadows as indicated below.
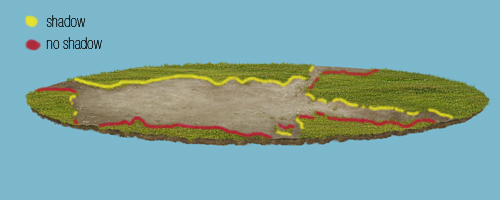
 You may not be aware that the shadow isn't everywhere. Look at the guide below. You can't see shadow where I added the red line. From our perspective the shadow isn't visible, so we simply don't add it there.
Step 9
For now we're done with this flying island. No worries, will get back to it soon. Let's switch to the "background color" layer. Add a Layer Mask to it and using big, black, soft brush reveal the white from the background layer. (If this doesn't work for you, just fill a new layer with a big white dot for the same effect).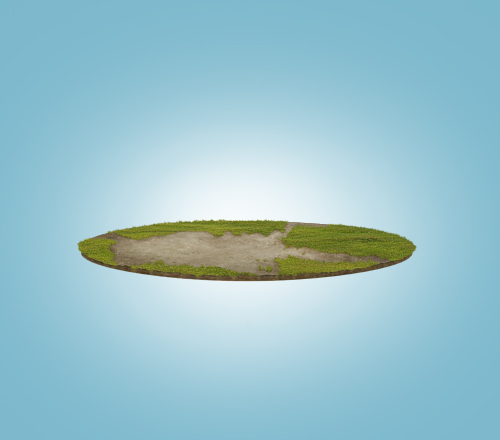 Create a new adjustment layer - Solid Color, and choose #4a5f6d for color. Name it "background color 2". Change its Blending Mode to Multiply. Delete its Layer Mask and apply Layer > Layer Mask > Hide All. Then paint on the Layer Mask with white in corners to darken the edges (mostly focus on the bottom of the design)
 Next add Gradient Map adjustment layer. Color from #200e3b to #f7da83. Change the layer Blending Mode to Soft Light.
Remember, this Gradient Map needs to affect only the background. Don't put it above all layers.
Next add Gradient Map adjustment layer. Color from #200e3b to #f7da83. Change the layer Blending Mode to Soft Light.
Remember, this Gradient Map needs to affect only the background. Don't put it above all layers.
Step 10
It's time to place this piece of ground somewhere. Below I just indicated where I wanted the shadow to be.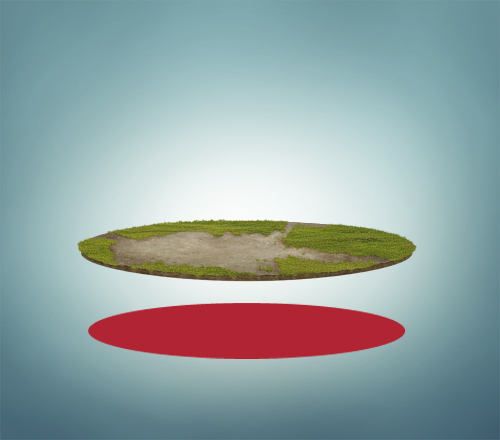 Start by selecting a brush of 1% Hardness and 1% Flow. Change the color to #a5d5d5, create a new layer above the latest gradient map and set this new layer Blending Mode to Multiply. Now paint where I indicated previously.
From the first look you may not see any difference, but if you take a closer look, you will note a very light blue color under the island.
Start by selecting a brush of 1% Hardness and 1% Flow. Change the color to #a5d5d5, create a new layer above the latest gradient map and set this new layer Blending Mode to Multiply. Now paint where I indicated previously.
From the first look you may not see any difference, but if you take a closer look, you will note a very light blue color under the island.
 Next, let's make this shadow deeper. Grab a dark blue color (#445f61), create new layer above the previous one, change it's layer Blending Mode to Multiply and use a very soft brush again (1% Hardness / 1% Flow) to add shadow.
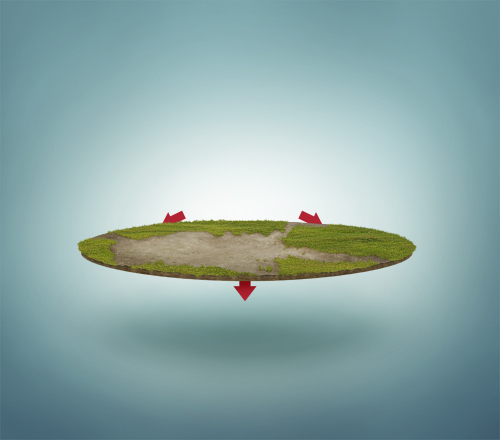
Then look at the three red arrows below, they indicate how the back light spreads. Now I want you to focus on the middle one. This is the place where light is very hard so this means our shadow needs to be less intensive here (deep in the back).
Next, let's make this shadow deeper. Grab a dark blue color (#445f61), create new layer above the previous one, change it's layer Blending Mode to Multiply and use a very soft brush again (1% Hardness / 1% Flow) to add shadow.
Then look at the three red arrows below, they indicate how the back light spreads. Now I want you to focus on the middle one. This is the place where light is very hard so this means our shadow needs to be less intensive here (deep in the back).
Step 11
As we have the background light set, it's a good time to cast some light on our land. Add a new adjustment layer - Curves above the lawn layer. Then you can use a Clipping Mask. Bring up the Hide All Layer Mask mode. Adjust the Curves as you see below and paint on the Layer Mask to start adding light in the indicated spot.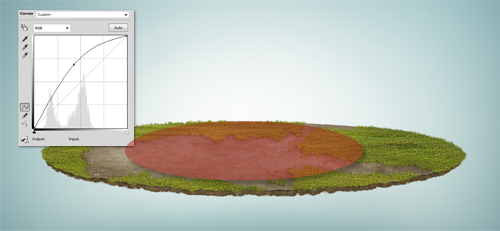 Repeat the same process, but this time add a new adjustment layer - Curves and set the slider to bottom/right. We will add shadows.
Red arrows indicate where to add shadows. Yellow arrows indicate where you should have previously focused with lights.
Repeat the same process, but this time add a new adjustment layer - Curves and set the slider to bottom/right. We will add shadows.
Red arrows indicate where to add shadows. Yellow arrows indicate where you should have previously focused with lights.
 Your result should look now something like that.
Step 12
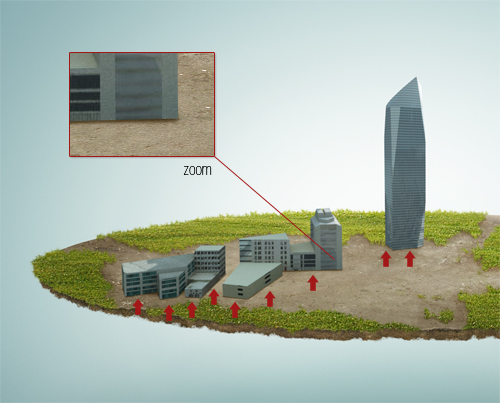
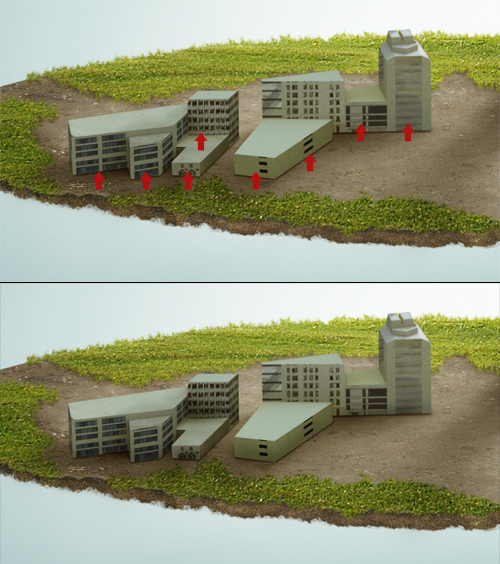
Now open an image of the city. This one is taken from a paid site, but you can take your time by finding similar ones from free stock collections. Remember that the perspective should be similar to the image you're creating. So grab the Pen Tool and pick some buildings of your own choice, then cut and paste them into our project (you need to place them above all layers). Create a new layer below the buildings, set it's Blending Mode to Multiply. Then use a very soft brush of #63522b color. And add tiny shadows towards the bottom edges of the buildings.
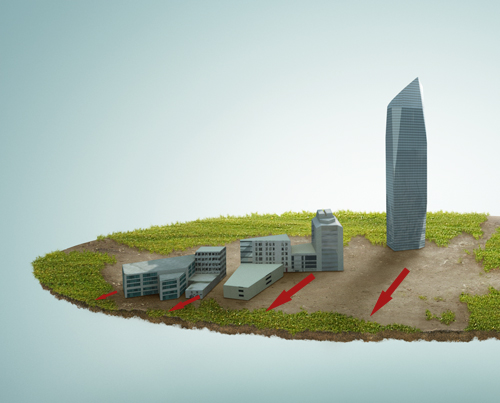
 Create another layer with a Multiply Blending Mode. Use the same brush color #63522b but this time make a softer and wider shadow. Create the feeling that it is being cast by the light behind, as the arrows indicate.
Step 13
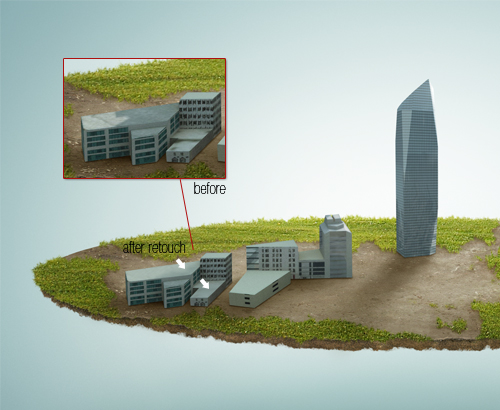
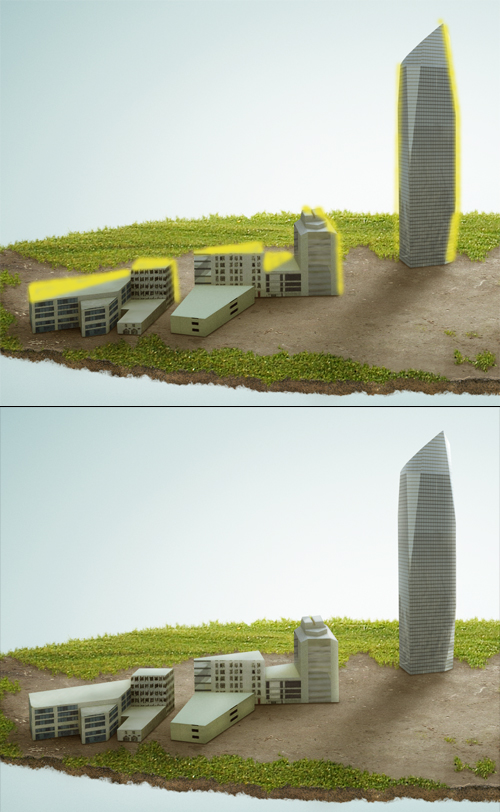
Now depending on what kind of buildings you chose, you may need to do some corrections. I didn't like 2 roofs from this picture, so I grabbed the Pen Tool and drew a Shape Layer over both.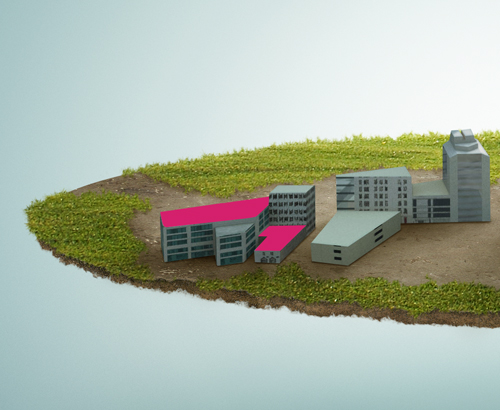 Then I changed the color of these roofs - I sampled the regular dull blue from another roof and filled both of those shapes. Then I lowered their Opacity just a little bit to bring back some of the roof texture.
You can also do some corrections with the Stamp Tool, there are many possibilities. I just used the most comfortable way for me.
Then I changed the color of these roofs - I sampled the regular dull blue from another roof and filled both of those shapes. Then I lowered their Opacity just a little bit to bring back some of the roof texture.
You can also do some corrections with the Stamp Tool, there are many possibilities. I just used the most comfortable way for me.
Step 14
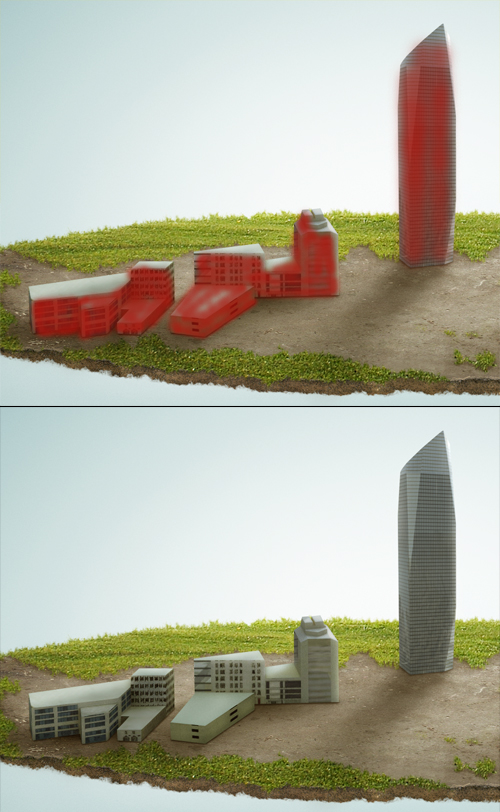
Now apply some adjustment layers to these buildings: -Selective Color: Cyans; Cyan +5, Magenta +100, Yellow -29, Black -47 Blues; Black -5 Neutrals; Cyan -9, Magenta +3, Yellow +21, Black -9 Black; Cyan +2, Magenta +10, Yellow +11, Black -5 Use Clipping Mask (Ctrl+Alt+G) - Color Balance: Midtones; Yellow/Blue -7 Shadows; Cyan/Red +8, Yellow/Blue -1 Use Clipping Mask (Ctrl+Alt+G) Now refer to the 2nd image in step 11 and use Curves to add some shading to the bottom of these buildings (remember to make a Clipping Mask).
 Next, again refer to step 11, use Curves to add some light to the indicated edges (make a Clipping Mask). These are the parts affected by back light.
 Repeat the same process, use a Brightness/Contrast adjustment layer. Set the Brightness to -81. Delete the original Layer Mask and apply Layer > Layer Mask > Hide All. Now add the shading as shown below. Paint with white on the layer mask to reveal some of the shadow (as indicated below). Remember to use a Clipping Mask for this layer.
Step 15
Set some final adjustment layers for the buildings, use a Clipping Mask for each: -Selective Color: Neutrals; Magenta -1, Yellow -14, Black -4 Blacks; Magenta +9, Yellow +6, Black -1 - Gradient Map: set from color #281b0c to #ffc34f, change the layer Opacity to 30% and set Blending Mode to Overlay - Color Balance: Midtones; Cyan/Red -4, Magenta/Green +6, Yellow/Blue +5 Highlights; Magenta/Green -45, Yellow/Blue -26
Step 16
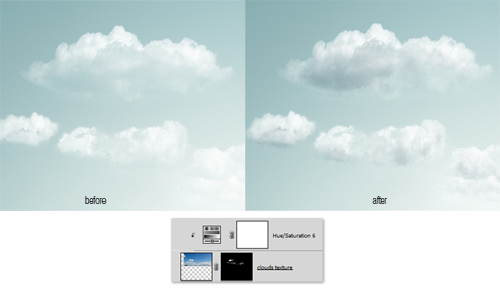
We can switch to adding clouds now. Bring up this image of clouds and transform it a little bit using Ctrl+T. This seemed too wide for me so I pushed the sides more to the center. Drag the image below the "buildings" layers. Name it "clouds". Then create a duplicate of it above and name it "clouds texture", then turn visibility of this layer off.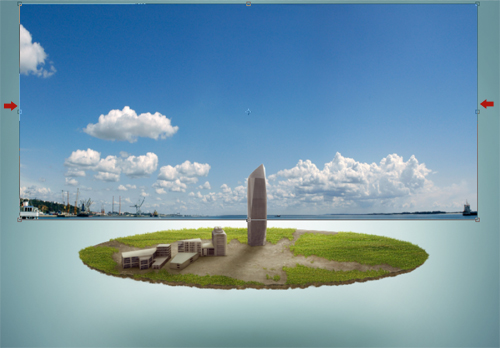 Then hit Ctrl+Shift+U to desature the clouds and change layer's Blending Mode to Screen.
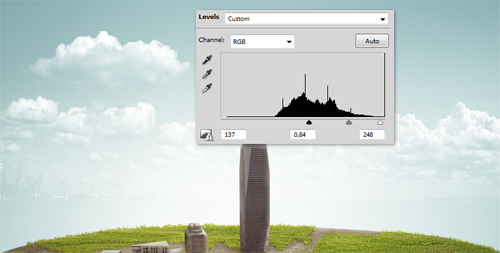
 Next use Levels to adjust the black and white depth. Make visible, hard black and white difference. Then switch to Eraser tool and get rid of unwanted parts of these clouds. Especially the ones in the back, and the landscape behind.
Step 17
Now this is something worth remembering, if you stop at this moment, the clouds will never look good. They are OK, but not good. It's because they still seem too transparent. But that's what the Screen blending mode does, can't blame it. This is the part where the "clouds texture" layer comes in. Turn it on above the "clouds" layer.
 Then apply Hue/Saturation to the "clouds texture" layer. Set Hue +198, Saturation 15, and check the option Colorize. Then make sure you still have the "clouds texture" layer selected and go to Layer > Layer Mask > Hide All.
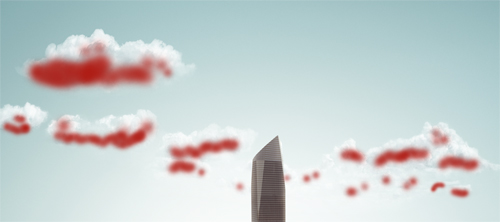
 Now use a normal, white, soft brush and paint on a Layer Mask to reveal the true texture of these clouds. Spots to paint are indicated below (red color).
 Can you see the difference? If you ask me... it's looking great now.
Step 18
Next, for some variety, let's add birds. Change this layer's Blending Mode to Multiply right after you drag to the project.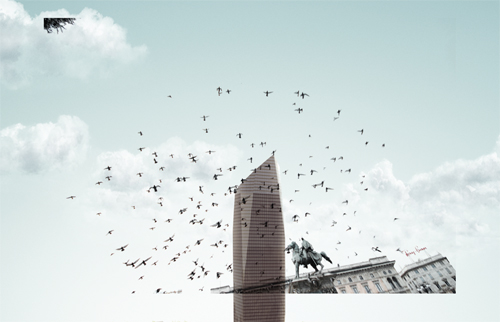 Select Lasso Tool (L) and pick some random birds, then hold Ctrl to move them without doing any cuts.
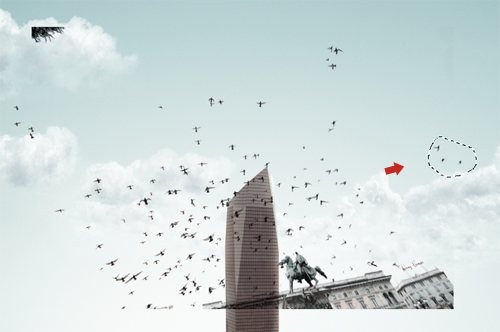 Erase the rest of the unwanted birds.
Step 19
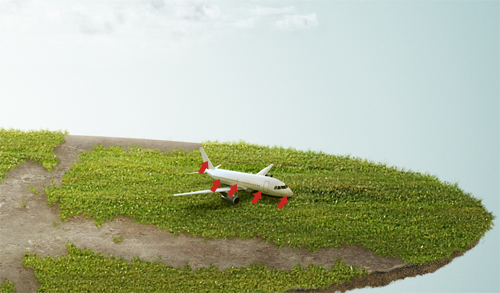
Now open the image of a plane. Cut this image out and make some necessary retouching using the Clone Stamp.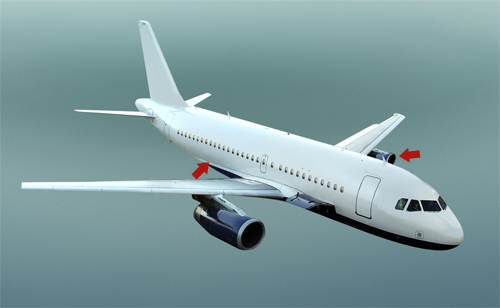 Size it down using Ctrl+T, then place it somewhere on the land. Create a new layer below it, and set its Blending Mode to Multiply. Pick #6b6a17 and paint a shadow under the plane.
 Create a new layer, this time above the plane (use Clipping Mask Ctrl+Alt+G), set the layer to Multiply and paint in the place indicated below. This will add some proper shading and will give an illusion of reflecting greens from the grass. Also to blend the plane more to the enviorment use the following two adjustment layers:
- Selective Color:
Reds; Cyan -6, Black -5
Cyans; Cyan -30, Magenta +68, Yellow +37, Black +100
Blues; Cyan +6, Yellow +100, Black -74
Neutrals; Cyan +2, Magenta +7, Yellow +31, Black +10
Blacks; Magenta +5, Yellow +14, Black -17
(use Clipping Mask Ctrl+Alt+G)
- Gradient Map:
color from #85c051 to #ff7c00, layer Blending Mode - Soft Light, Opacity 50%
(use Clipping Mask Ctrl+Alt+G)
Create a new layer, this time above the plane (use Clipping Mask Ctrl+Alt+G), set the layer to Multiply and paint in the place indicated below. This will add some proper shading and will give an illusion of reflecting greens from the grass. Also to blend the plane more to the enviorment use the following two adjustment layers:
- Selective Color:
Reds; Cyan -6, Black -5
Cyans; Cyan -30, Magenta +68, Yellow +37, Black +100
Blues; Cyan +6, Yellow +100, Black -74
Neutrals; Cyan +2, Magenta +7, Yellow +31, Black +10
Blacks; Magenta +5, Yellow +14, Black -17
(use Clipping Mask Ctrl+Alt+G)
- Gradient Map:
color from #85c051 to #ff7c00, layer Blending Mode - Soft Light, Opacity 50%
(use Clipping Mask Ctrl+Alt+G)
Step 20
Next, open one of these roads. Drag it to the project. Use Ctrl+T > Distort to create the correct perspective going through the land. This layer has to be above the lawn layer.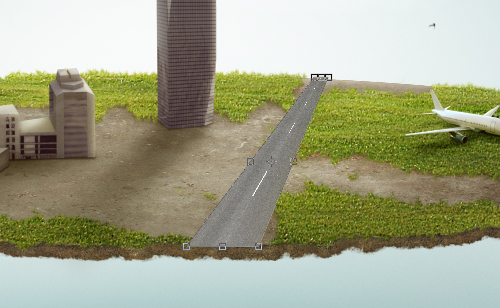 Again use the great watercolor brushes from WeGraphics. Pick one of them, select a black color and create a Layer Mask for the road layer. Then paint on this Layer Mask where you covered the grass with road. This should reveal some lawn, giving an illusion that it's over the road.
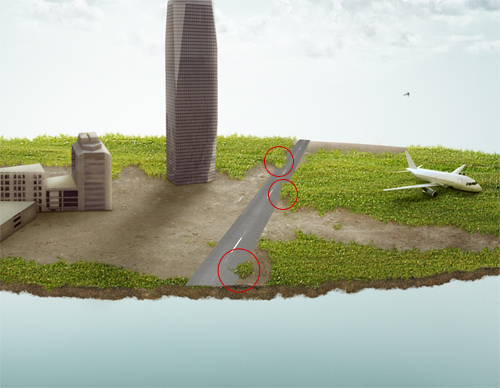 Now, create a new layer below the road, change its Blending Mode to Multiply and for the color select #745e23. Then start adding shadow with a soft brush as shown below.
 Then add shadow on the road, below the grass. Now create a new layer above the road layer. Change its Blending Mode to Mulitply. Select a small soft rounded brush and use #544827 for painting the shadow. To avoid spreading this shadow beyond the road use a Clipping Mask (Ctrl+Alt+G).
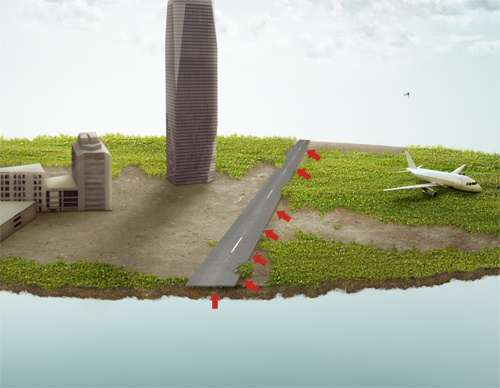
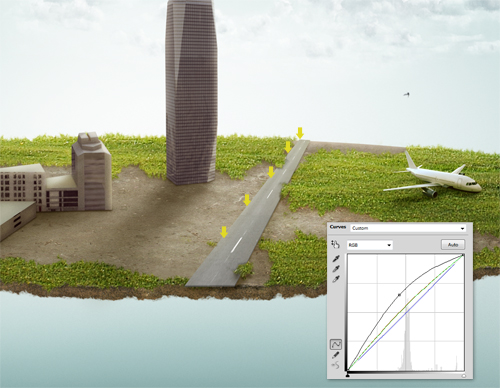
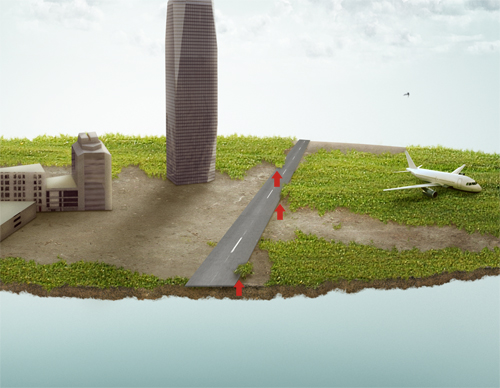 Going further, create another Adjustment Layer - Curves above. Adjust it as you see below (doesn't need to be exactly the same, just similar). Then delete the Curves Layer Mask and go to Layer > Layer Mask > Hide All. Then use a soft white brush and paint on the Layer Mask to add some light to the road (follow the arrows below). Remember to use a Clipping Mask (Ctrl+Alt+G) for Curves.
Step 21
I thought about adding something funny in the design, and a car falling from the end of the road seemed like the right thing. So open the image of this truck. Cut it out using the Quick Selection Tool (W). Next using Ctrl+T rotate it to the correct - falling position. Then apply Image > Adjustments > Shadows/Highlights.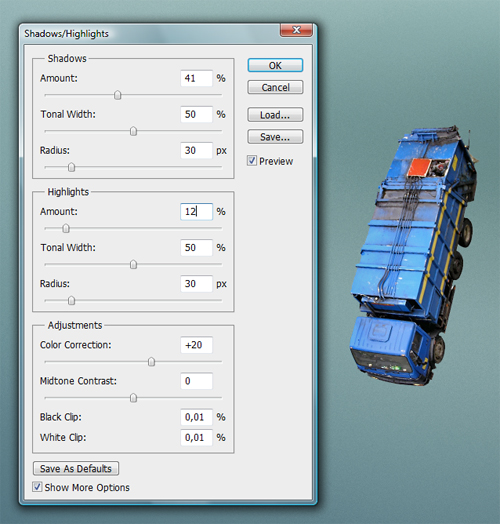 Next, apply a Selective Color adjustment to the truck:
Reds; Cyan +10, Magenta -26, Yellow +21, Black -28
Yellows; Cyan +5, Magenta +100, Yellow +50
Cyans; Cyan -17, Magenta -25, Yellow +21, Black -7
Blues; Magenta +1, Yellow +61, Black -3
Neutrals; Magenta +10, Yellow +15, Black -10
Blacks; Magenta +12, Yellow +12, Black -7
Then refer to step 11 again, add two Curves Adjustment Layers using the Clipping Mask. One lights (curves slider a little bit up/right), second shadows (curves slider a little bit bottom down). Turn both Masks into Hide All and paint with white on them to create shadows (red color below) and lights (yellow color below).
Next, apply a Selective Color adjustment to the truck:
Reds; Cyan +10, Magenta -26, Yellow +21, Black -28
Yellows; Cyan +5, Magenta +100, Yellow +50
Cyans; Cyan -17, Magenta -25, Yellow +21, Black -7
Blues; Magenta +1, Yellow +61, Black -3
Neutrals; Magenta +10, Yellow +15, Black -10
Blacks; Magenta +12, Yellow +12, Black -7
Then refer to step 11 again, add two Curves Adjustment Layers using the Clipping Mask. One lights (curves slider a little bit up/right), second shadows (curves slider a little bit bottom down). Turn both Masks into Hide All and paint with white on them to create shadows (red color below) and lights (yellow color below).
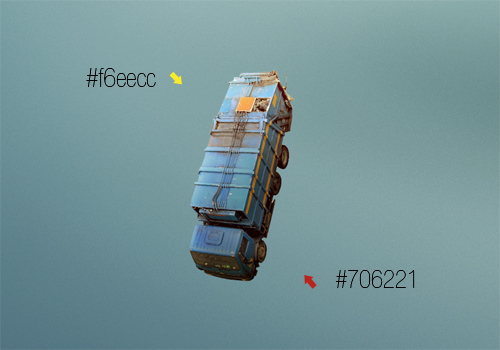
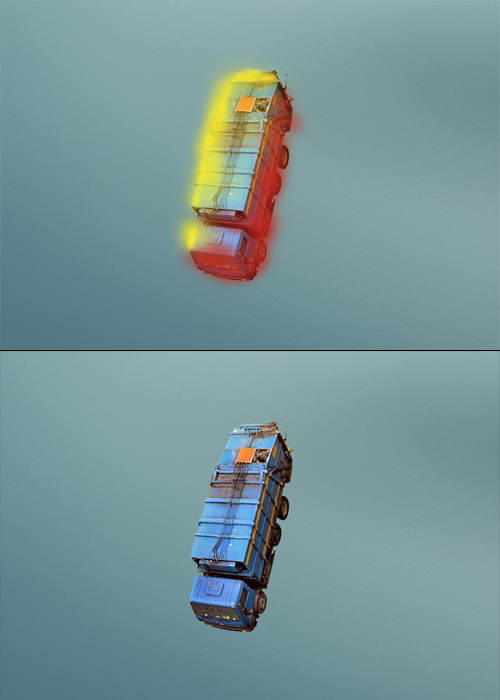 To enhance the shading create a new layer above curves, use the Clipping Mask (Ctrl+Alt+G) for it. Change its Blending Mode to Multiply, select a soft brush of #706221 color and paint where the red arrow indicates (to add shadow). Next repeat the same process, but this time create a new layer above the previous, use Clipping Mask (Ctrl+Alt+G) for it. Change its Blending Mode to Soft Light, select a soft brush of #f6eecc color and paint where the yellow arrow indicates to add light.
If you don't know where to paint use the refernce image from the previous step.
To enhance the shading create a new layer above curves, use the Clipping Mask (Ctrl+Alt+G) for it. Change its Blending Mode to Multiply, select a soft brush of #706221 color and paint where the red arrow indicates (to add shadow). Next repeat the same process, but this time create a new layer above the previous, use Clipping Mask (Ctrl+Alt+G) for it. Change its Blending Mode to Soft Light, select a soft brush of #f6eecc color and paint where the yellow arrow indicates to add light.
If you don't know where to paint use the refernce image from the previous step.
Step 22
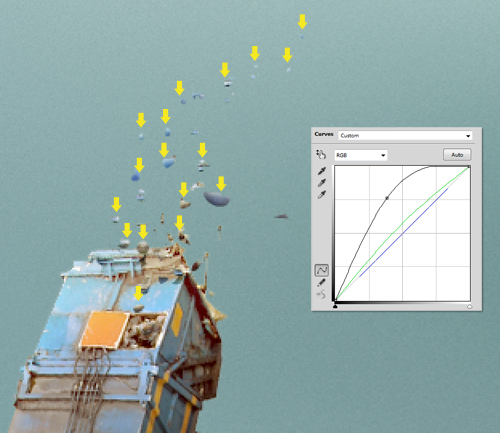
Merge all the truck layers using Ctrl+E (you need to have them all selected). Duplicate the truck layer Ctrl+J. Grab Lasso Tool. Then select a small piece of the truck and while holding Ctrl move it away. Repeat the process several times to get a little bit messy. This is the same technique that I used to spread the birds earlier.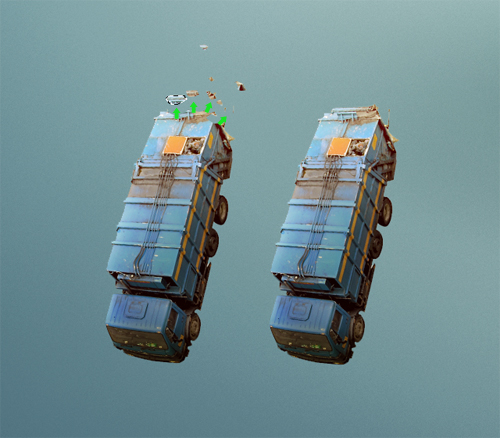 Select those little pieces that you made and move them to our orginal truck, then delete the truck on the left.
Step 23
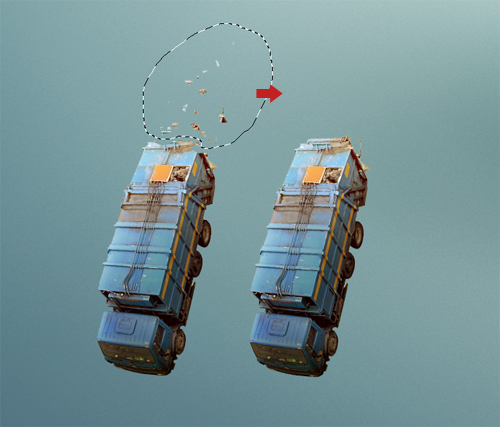
You can name those pieces "garbage". So now create an Adjustment Layer - Curves above the "garbage" layer. Use Ctrl+Alt+G for Clipping Mask. Set the Curves as shown below. Then delete orginal Layer Mask and apply Layer > Layer Mask > Hide All. Next, using a white soft brush paint to add shadows in spots indicated below.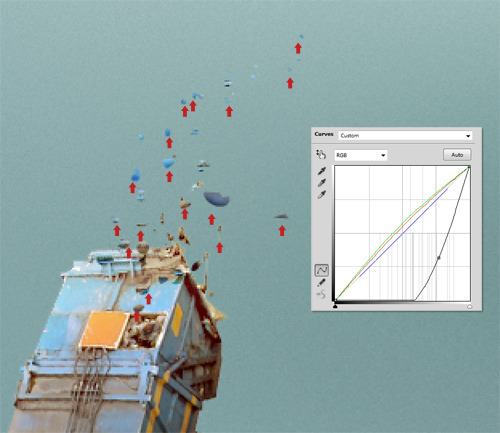 Then again, create an Adjustment Layer - Curves above the previous curves. Use Ctrl+Alt+G for Clipping Mask. Set the Curves as shown below. Then delete the orginal Layer Mask and apply Layer > Layer Mask > Hide All. Next, using a white soft brush paint to add some lights in spots indicated below.
 Be creative with the shading process, you don't have to add lights and shadows from only one direction. These pieces are very small, if you add some different shading they will get a glimplse of depth when you zoom out.

Step 24
Also remember the truck proportions and its position in the design. Place it in front of the road. And while you're doing that, you will need to add shadow below. So create a new layer below the truck, change its Blending Mode to Multiply and use a color of #284143 to paint on the ground. You need to have 1% Hardness / 1% Flow brush selected, or otherwise you will get an ugly result. Also remember the first shadow line that you're adding now needs to be wide and soft like you see below.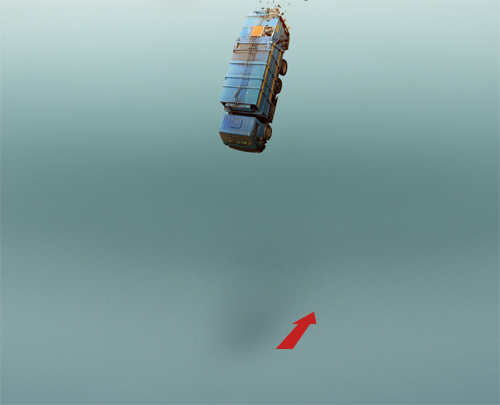 Next create another new layer below the truck, change its Blending Mode to Multiply and use the same color of #284143 to paint on the ground. You need to have a 1% Hardness / 1% Flow brush selected. And this shadow needs to be more pointed and centered, you'll notice that there is now a small, darker dot in the center of the shadow.
Step 25
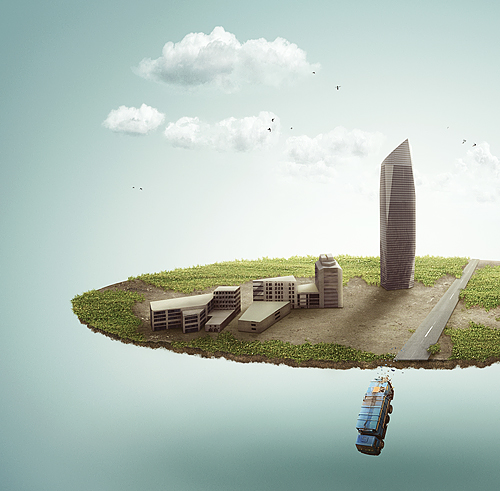
To finish this piece it's good to add some final adjustment layers, as follows: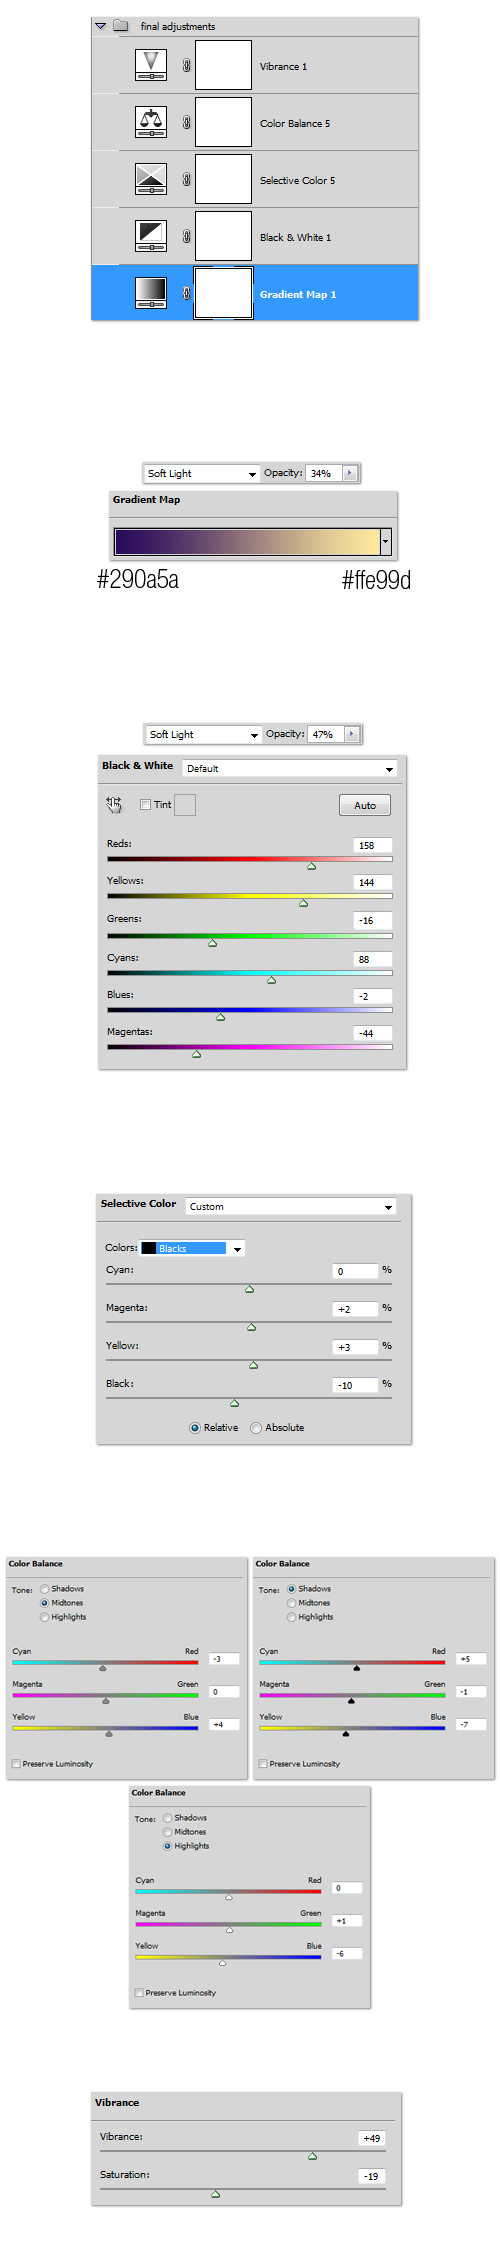 Final outcome:
Step 26
But... "what if I wanna add more?" Yes you're right, more things can be done here, but for tutorial purposes I just wanted to show you the basics of creating the illustration. To further the piece you could add more elements plus additional lights and shadows. The main point is for you to understand how this process works. So instead of adding different objects here, I placed several shapes in space. Let me explain how it works: - The red dot in the center, and these red arrows, this is our main light source (which I set myself). It means that every object in this illustration will be affected with that light. Also the arrows show how the light is spreading. That's why some objects may have different shadow directions. - Object 1. It's the closest one to the viewer, that's why it has to be bigger than the other ones. Also according to the arrows it will receive light from the top/right side. - Object 2. Further in space = smaller. According to the arrows it will receive light from the top/left side. I also didn't cast any shadow below it, as it's too high, the shadow would be almost invisible. - Object 3. This one will not necessarly be smaller. Let's assume it's a huge building, so it still may be pretty big even though it's far away in the space. Also according to the arrows it will receive light from the top and left side. This means the shadow will be cast on the ground to the right/bottom. - Object 4. Deep in space = very small and hazy. It will receive light mostly from the bottom depending on it's position and how it's rotated.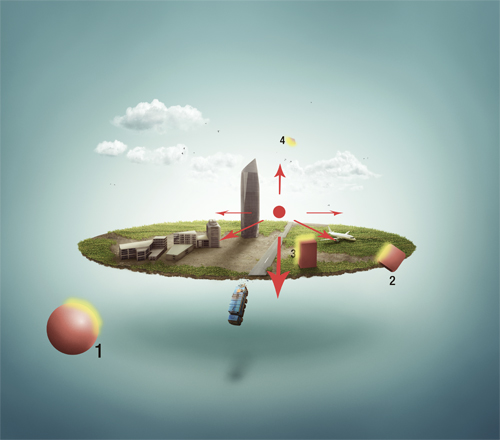 Now, if you can replace these objects with real life elements, like planes, balloons, or buildings etc... and shade them properly you can achieve some more fantastic results!

Preview
More from Tutorials

How to Easily Remove Smoke From The Background in Photoshop
Tutorialsby Diego Sanchez
Smoke images can be used in a wide range of applications across various designs, such as adding drama to a photograph, crafting captivating visual effects on posters, or even giving your artwork a mysterious halo. Whichever the case, transparent smoke can serve as a powerful tool in your arsenal. So today, I will show you how easy it is to remove the background from a smoke image, and in the process, prepare the file to change the smoke color at any time you want, allowing you to seamlessly integrate it into your projects.
Read more
Easily Make a Glass Texture Effect in Photoshop
Tutorialsby Diego Sanchez
The glass effect has been used by many designers and photographers to add depth and dimension to their compositions with a touch of modern elegance. There are, of course, many different ways to apply a glass effect in Photoshop, but today I will show you how easy it is to make your own glass texture and apply realistic distortion to any of your images using nothing but the default Photoshop tools.
Read more
How to Easily Make Your Vector Digital Signature
Tutorialsby Diego Sanchez
In today's digital life, whether you are a freelancer, a business owner, or simply someone who frequently engages in digital transactions, having a well-crafted digital signature is almost indispensable to add a touch of authenticity and credibility to your documents. So today, I will show you how easily you can make your own vector digital signature in Illustrator for you to sign your digital documents or incorporate it into any design work.
Read more
Easily Make an Editable Grunge Text Effect in Photoshop
Tutorialsby Diego Sanchez
There are different ways to make a grunge text effect in Photoshop while keeping your text fully editable, and the most known one is to use a texture as a layer mask to hide part of the text. But Today I will show you a differnt approach on how you can make this kind of effect, while keeping you text fully editable and at the same time give you a bit more control over that effect by using a texture in a new layer (instead of a layer mask) that you can later move, scale, replace or combine with other textures without replacing any kind of layer mask.
Read more