Create a Dramatic Film Poster in 5 Minutes Using Photoshop
Here's a look at what we'll be creating.

Step 1
After some searching I found an excellent photo [unfortunately no longer available] to use for our poster. The girl in the photo is very sinister looking, which is perfect. But I want to exaggerate her evilness a little bit further. We're going to use the Liquify Filter to accomplish that. Click ( Filter | Liquify ) to load the filter window. Will be using the Bloat Tool (B) to make her eyes larger, and we'll use the Forward Warp Tool (W) on her mouth and eyebrows. Below you can see the brush strokes that I made with these tools. The animation below shows the before and after effects of the Liquify Filter.

Step 3
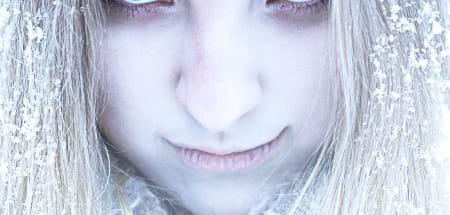
Next I want to brighten her eyes to the point where they look inhuman, and I also want to darken the shadows under her eyes and around her face. I used the Dodge Tool on her eyes and the Burn Tool on the shadows. Below are my results.
Step 4
Lets sharpen the image using the High Pass filter trick. Duplicate the layer and select (Filter | Other | High Pass). Enter 15 for the amount. Set this layer's blend mode to Opacity.

Step 5
Now we're going to add some adjustment layers to enhance the contrast and detail of the image. First up, a levels adjustment. Next, we need a Hue/Saturation adjustment. We'll remove some of the saturation and slightly adjust the hue to a cooler tone.
 Now lets add a Photo Filter adjustment to further the cooling effect.
 Finally, lets add a Curves adjustment.

Step 6
Now we need a new layer above the image, but below our adjustment layers. With a large, soft white brush, with an Opacity and Flow set to 30%, begin to lighten the image taking the edges to completely white. The adjustment layers apply the same cool blueish tone to our white brushed area, completing the cold effect we want for the image.
Step 7
Now we need to apply some type to complete the poster. Your typography can make or break your poster design. It seems that there is sort of a go too style when it comes to movie posters. If you choose to go outside of that style make sure you do it with the intention further the impact your poster is trying to convey. Here is one great example of going outside the typical film poster style. For the list of actors at the top, I went to IMDB and chose some actor names at random. I used Myriad Pro Condensed for the first names and Condensed Bold for the last names. Any condensed sans-serif font will work well for this step, if you don't have Myriad Pro. For the title I chose Trajan Pro. Love it or hate it, it's a good looking font, and it's used a lot for movie titles for it's dramatic look and feel.
 I applied a slight drop shadow and inner glow layer styles to the title font.

 For the credits, I used a font called SF Movie Poster. This is a great condensed font, excellent for adding a ton of names into a very tight space.
 Below is the finished poster. I hope these techniques gave you some insight into how fast and easy a dramatic film poster can be created.
More from Tutorials

How to Easily Remove Smoke From The Background in Photoshop
Tutorialsby Diego Sanchez
Smoke images can be used in a wide range of applications across various designs, such as adding drama to a photograph, crafting captivating visual effects on posters, or even giving your artwork a mysterious halo. Whichever the case, transparent smoke can serve as a powerful tool in your arsenal. So today, I will show you how easy it is to remove the background from a smoke image, and in the process, prepare the file to change the smoke color at any time you want, allowing you to seamlessly integrate it into your projects.
Read more
Easily Make a Glass Texture Effect in Photoshop
Tutorialsby Diego Sanchez
The glass effect has been used by many designers and photographers to add depth and dimension to their compositions with a touch of modern elegance. There are, of course, many different ways to apply a glass effect in Photoshop, but today I will show you how easy it is to make your own glass texture and apply realistic distortion to any of your images using nothing but the default Photoshop tools.
Read more
How to Easily Make Your Vector Digital Signature
Tutorialsby Diego Sanchez
In today's digital life, whether you are a freelancer, a business owner, or simply someone who frequently engages in digital transactions, having a well-crafted digital signature is almost indispensable to add a touch of authenticity and credibility to your documents. So today, I will show you how easily you can make your own vector digital signature in Illustrator for you to sign your digital documents or incorporate it into any design work.
Read more
Easily Make an Editable Grunge Text Effect in Photoshop
Tutorialsby Diego Sanchez
There are different ways to make a grunge text effect in Photoshop while keeping your text fully editable, and the most known one is to use a texture as a layer mask to hide part of the text. But Today I will show you a differnt approach on how you can make this kind of effect, while keeping you text fully editable and at the same time give you a bit more control over that effect by using a texture in a new layer (instead of a layer mask) that you can later move, scale, replace or combine with other textures without replacing any kind of layer mask.
Read more