Making a Superhero Movie Teaser Poster
Preview

Step 1
Start out with a dark canvas #080808 of 1600x2300 pixels (300dpi). I like to work on a high resolution so you keep your images sharper, more flexible and optimal for printing purposes if needed.Step 2
To make the background a little more interesting and give it some "body" I used this free stained paper texture. Desaturate the texture, set your blending mode to hard light and pull the opacity down to 30%.
Step 3
Add the Nebula image in a new layer on top of the texture, flip it and use Hue Saturation (192, 26, 0). It should give a blue color as shown. Now use your mask tool to blend the image in the background. Only left, right and bottom should be masked (see image).
Step 4
Next up is adding the horizon image. Just like the steps before, desaturate the image and use soft light on your blending mode. I duplicated the image to make it show a little more detail. Use your gradient tool to mask the image from the top. We only need to see the mountain / rocks and a small piece of the sky.
Step 5
Pentool out the woman stock and place it on the nebula. Use a soft brush with 30% opacity to make the marked parts softer and blend them a little more into the background. The lower part of the woman has to be removed. I also used the smudge tool 30% strength) to retouch the face and arm.
Step 6
Use your pentool to draw the shape on the cheek of the woman. Colors used and layer styles are shown in the image. The only thing left to do is give the shape a soft light blending mode and a drop shadow on the top with an opacity of 25%. To make the shape blend more you can make a mask and use a soft brush on the left side of the shape.
Step 7
Let's add some more detail. In a new layer use a soft white brush (20%) to make the space marked in the red circle a little lighter. This gives more depth and makes the shape more shiny. Also add a brush stroke with your pentool to the top of the shape. Use the scratched metallic texture pack to add some scratches to the shape. Place the texture in the canvas, desaturate it and clip it on the shape as shown in the image. Set the opacity between 20-40%.
Step 8
Now we added the metallic scratch texture we are going to add extra detail to the shape. Make a selection of the computer chips stock and place it on the shape (opacity 85%, blending mode: soft light). Use your mask tool to mask it in the shape. I usually use a soft brush around the hard edges to blend it in. Finally, I also added two layers where I drew blue strokes and sparkles to give it more depth. To make the stroke on the top of the shape even more shiny you can add a white radial gradient.
Step 9
Make new layers and draw two shapes with your pentool as shown in the image. As we did before again use a soft white brush to highlight some parts of the shape. Only the top shape needs a drop shadow on the bottom. You can make a mask on your shape and brush out the hard edges of your pentooled shape. The next texture based steps are the same as used on the blue shape.
Step 10
If you followed the steps of texture usage and detail placement again, you we have a similar result as shown in the picture. To make the character more "superhero like" I added a glow to her eyes. Just use a radial gradient on top of the eyes (color: #10bdee) and set your opacity to 50% and layer style to screen.
Step 11
Create a folder called color adjustments and place it on the top of all your layers. That way it will effect all the layers below it. Color fill: color: #020317, set layer style to screen Selective color: Reds: +37, -10, -33. +30 Yellow: +25, 0, -15, 0 Neutrals: +5, 0, +2, +2 Blacks: +20, 0, 0, 0 Brightness / contrast: Brightness: 11 Contrast: 7 Finally add a level layer. This really depends on how dark or light you want the image to be.
Step 12
Select the layer of the woman. Use your marque or lasso tool to make a selection of the part you want to make a cut from. Copy the selection and paste it in the exact same place. Use inner shadow and you get results as shown in the picture. For the arm part I did it a little different. I made a selection and filled it with color: #705e53. Then gave it an inner shadow.
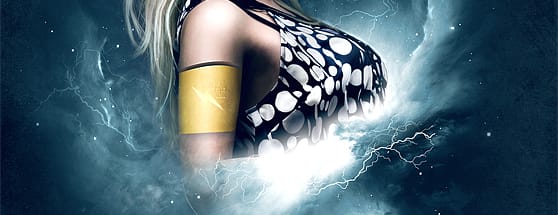
Step 13
For the arm part you can use the steps I explained for the head shapes. Only thing added here is the placement of an electric symbol. Draw this with your pentool and fill it with color: #FFFFC1. You can make it fall in the shape with a subtle inner shadow.
Step 14
The rest of this tutorial is really up to your imagination. For this piece, I added helicopters and used dazzling lightings vector set for example. Just let your creativity run free and add anything you like to the piece until you are satisfied with your result.
Step 15
To finish it up add the the text. I used lightning beams covering the text. To do this, just copy a beam on the canvas, put it on top of the text and set blending mode to overlay. I used a soft brush to mask bits of the text. The font I used it called "The Sans". To finalize the image and make it more crisp I used smart sharpen (filter -> sharpen). Set it to about 30%. Don't overdue it.
Finished
More from Tutorials

How to Easily Remove Smoke From The Background in Photoshop
Tutorialsby Diego Sanchez
Smoke images can be used in a wide range of applications across various designs, such as adding drama to a photograph, crafting captivating visual effects on posters, or even giving your artwork a mysterious halo. Whichever the case, transparent smoke can serve as a powerful tool in your arsenal. So today, I will show you how easy it is to remove the background from a smoke image, and in the process, prepare the file to change the smoke color at any time you want, allowing you to seamlessly integrate it into your projects.
Read more
Easily Make a Glass Texture Effect in Photoshop
Tutorialsby Diego Sanchez
The glass effect has been used by many designers and photographers to add depth and dimension to their compositions with a touch of modern elegance. There are, of course, many different ways to apply a glass effect in Photoshop, but today I will show you how easy it is to make your own glass texture and apply realistic distortion to any of your images using nothing but the default Photoshop tools.
Read more
How to Easily Make Your Vector Digital Signature
Tutorialsby Diego Sanchez
In today's digital life, whether you are a freelancer, a business owner, or simply someone who frequently engages in digital transactions, having a well-crafted digital signature is almost indispensable to add a touch of authenticity and credibility to your documents. So today, I will show you how easily you can make your own vector digital signature in Illustrator for you to sign your digital documents or incorporate it into any design work.
Read more
Easily Make an Editable Grunge Text Effect in Photoshop
Tutorialsby Diego Sanchez
There are different ways to make a grunge text effect in Photoshop while keeping your text fully editable, and the most known one is to use a texture as a layer mask to hide part of the text. But Today I will show you a differnt approach on how you can make this kind of effect, while keeping you text fully editable and at the same time give you a bit more control over that effect by using a texture in a new layer (instead of a layer mask) that you can later move, scale, replace or combine with other textures without replacing any kind of layer mask.
Read more