Creating Dynamic Video Game Cover Art in Adobe Photoshop
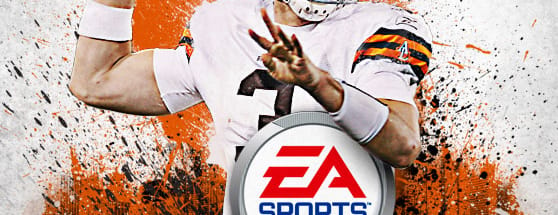
Let's dig in. Below is the cover art for our inspiration.

Step 1
We want to create a blank canvas with the same aspect ratio as a video game cover. I chose 1250x1500 at 300 dpi. This is not exact print spec, but it doesn't matter since this art won't be printed anyway. Next, we need to gather a few elements. Most importantly is our NFL player, and supporting logos. I've made it easy for you and gathered everything up into one convenient download.Step 2
Now we want to open our photo of the football player and extract him from the background. Use whatever method you prefer for making your selection. I tend to use Quick Mask Mode (Q) almost exclusively. Experiment and find a method that you prefer. Next, we want to sharpen this guy up A LOT. So much so that it has an unnatural look. Make a copy of the player layer, and choose Filter | Other | High Pass, and move the slider way up to 6 or higher. Then set this new layer's blending mode to Overlay.

Step 3
Now lets add a little bit of texture to our cover. I used #4 from the Subtle Grunge Texture Pack here at WeGraphics. I placed the layer above all other and scaled it down to fit, then set the layer blending mode to Multiply, and the Opacity to 50%. I also converted it to Grayscale and with the eraser tool removed some of the middle, so there wouldn't be too much grunge over the player.

Step 4
Even though our background is going to mostly be made up of paint splatters, I want to throw in something that adds a little depth to the scene. I grabbed a New York City skyline photo and duplicated it across the bottom. I set the blending mode to Multiply.
Step 5
Now let's add the EA Sports logo above the player. Copy and paste the logo from the EPS file included in the download from above. I placed the logo underneath the players arm, and erased a portion of the logo by taking the opacity down and erasing the part that was cover his arm. Then in a new layer I drew a little bit of shadow with a soft black brush. Be subtle when drawing this shadow!
Step 6
Okay, now comes the fun part? adding paint. I used the Splatters Vol2 set here at WG. There are a few things to pay close attention to when placing your splatters. First off, I only used 3 colors, all picked from the players jersey. A black, orange, and very light grayish white. I placed some of the orange and white splatters above the players layer so that it appears that they are coming off of his helmet or jersey. All of the rest of the splatters are on layers below the player.
Step 7
Let's add the game title now. For "Madden" I chose a font similar to the original from our inspiration image, but this one is a little more roughed, and I like that. The font is called PortagoITC TT. For the Number 12 I used a font called Varsity. The NFL logo is in the zip from the download above. Let's also add our game console header to the top. You can grab the PS3 logos from the download as well. Create a box using the rectangle selection too and fill it with a gradient (left: #000000 right: #949496) I also made another thin strip below the gradient bar and filled it with an orange sampled from the players helmet.

Step 8
To wrap this up we need to finish out the bottom portion of the graphic and maybe flesh out our splatters a little more. I added a white strip behind the game title and set its opacity to 75%, and then added some larger splatters underneath to fill the white space. I couldn't help myself and added some larger splatters behind the player as well. I then added the game rating logo to the bottom left corner to complete the design.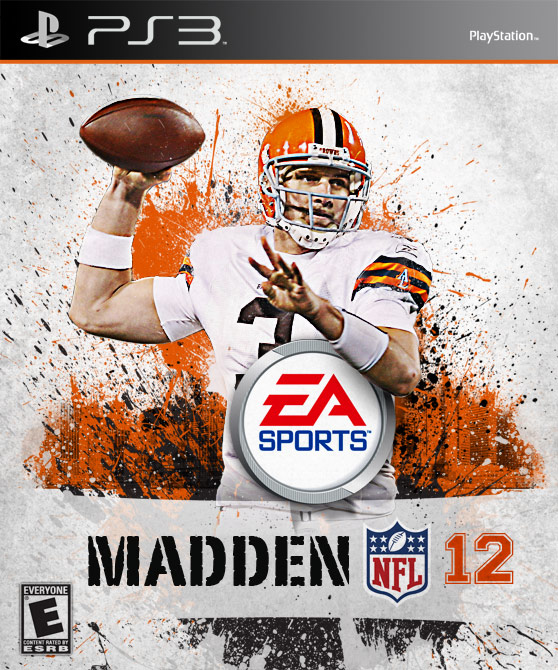
Conclusion
I hope this helps you to see how easy and quick it can be to create something of impact. Video game is incredible and dynamic. To design in that world you have to be incredibly creative and resourceful with your art. Try some of these techniques and experiment as much as possible. Have fun and keep designing!More from Tutorials

How to Easily Remove Smoke From The Background in Photoshop
Tutorialsby Diego Sanchez
Smoke images can be used in a wide range of applications across various designs, such as adding drama to a photograph, crafting captivating visual effects on posters, or even giving your artwork a mysterious halo. Whichever the case, transparent smoke can serve as a powerful tool in your arsenal. So today, I will show you how easy it is to remove the background from a smoke image, and in the process, prepare the file to change the smoke color at any time you want, allowing you to seamlessly integrate it into your projects.
Read more
Easily Make a Glass Texture Effect in Photoshop
Tutorialsby Diego Sanchez
The glass effect has been used by many designers and photographers to add depth and dimension to their compositions with a touch of modern elegance. There are, of course, many different ways to apply a glass effect in Photoshop, but today I will show you how easy it is to make your own glass texture and apply realistic distortion to any of your images using nothing but the default Photoshop tools.
Read more
How to Easily Make Your Vector Digital Signature
Tutorialsby Diego Sanchez
In today's digital life, whether you are a freelancer, a business owner, or simply someone who frequently engages in digital transactions, having a well-crafted digital signature is almost indispensable to add a touch of authenticity and credibility to your documents. So today, I will show you how easily you can make your own vector digital signature in Illustrator for you to sign your digital documents or incorporate it into any design work.
Read more
Easily Make an Editable Grunge Text Effect in Photoshop
Tutorialsby Diego Sanchez
There are different ways to make a grunge text effect in Photoshop while keeping your text fully editable, and the most known one is to use a texture as a layer mask to hide part of the text. But Today I will show you a differnt approach on how you can make this kind of effect, while keeping you text fully editable and at the same time give you a bit more control over that effect by using a texture in a new layer (instead of a layer mask) that you can later move, scale, replace or combine with other textures without replacing any kind of layer mask.
Read more