Give Your Photos a Fast and Simple Instagram Effect
Step 1 - A Good Photo
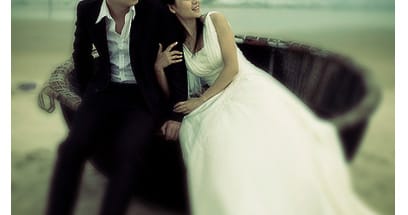
Start with a good photo. This may seem obvious to some, but that's not always the case. There's no Instagram setting available that is going to turn a bad photo into a good one. Trust me. For my little tutorial here, I found this great photo by linh.ngan.
Step 4 - Square is the New Landscape
Part of the appeal of Instagram, in my opinion, is the square cropping. Why? Because it's different. It's not portrait, it's not landscape... it's something completely new. Cropping a photo to a square can sometimes be a challenge. You want to try and get everything important into the square so the new photo reads the same as the original. Here is the photo cropped using the Crop Tool (C). Hold the Shift key down as you click and drag out the crop area. Press the enter key to complete the crop.
Step 3 - A Little Cross Processing
A little goes a long way here, so don't overdue your cross processing. To add the cross processed look, I created a Curves adjustment layer over my photo. I used the following settings for my Curves adjustment.
 Here's a look at the photo with these adjustments. Pretty big difference for one simple adjustment layer, huh?

Step 4 - A Must-Have Vignette
What's a vintagey Instagram look without a nice vignette? Or maybe you're asking "What's a vignette? A vignette is that darkened edge effect that you see on a lot of vintage photo effects. Here's how to create one in a single step. Create a new Curves adjustment layer. On the adjustment layer's mask use a large soft black brush to paint a circle in the center of the image. Now when you make this adjustment it will only effect the outer edge of the photo where the white appears on the mask. Adjust the RGB curve to something similar to what I have below.
 Here's a look at the newly created subtle vignette.

Step 5 - Blurring the Edges
Instagram gives you the option to blur the edges around the subject matter of a photo. You can control the position and size of the focus area as well. Lets take a quick look at how to achieve the same effect in Photoshop. Duplicate the original photo layer, and create a new layer mask for the layer copy. Run a Gaussian Blur (Filter | Blur | Gaussian Blur), and choose an amount that blurs the details of the photo. Now on the layer's mask, use a soft black brush to paint the area that you want to be in focus. This is essentially revealing the layer below that is not blurred. For this photo I chose the area over the subjects faces.

Step 6 - Adding a Border
Some of the effects in Instagram add a cool border effect. For this image lets add a nice rounded white border. To do that, choose the Rounded Rectangle Tool (U) from the tools panel. While holding the shift key draw a rectangle in the center of the image. This creates a vector shape layer. Cmd+Click the vector shape layer's mask to create a selection from the shape. Now create a new layer above all others, then press Cmd+Shift+i to invert the selection. Press (D) then (X) on the keyboard to reset the colors and make white the foreground. Then fill the selection by choosing (Edit | Fill) or by using the Paint Bucket Tool (G). You can now delete the vector shape layer.
 There you have it! I hope this little exercise has inspired you to create your own Instagram style vintage photos. Experiment and have fun!
More from Tutorials

How to Easily Remove Smoke From The Background in Photoshop
Tutorialsby Diego Sanchez
Smoke images can be used in a wide range of applications across various designs, such as adding drama to a photograph, crafting captivating visual effects on posters, or even giving your artwork a mysterious halo. Whichever the case, transparent smoke can serve as a powerful tool in your arsenal. So today, I will show you how easy it is to remove the background from a smoke image, and in the process, prepare the file to change the smoke color at any time you want, allowing you to seamlessly integrate it into your projects.
Read more
Easily Make a Glass Texture Effect in Photoshop
Tutorialsby Diego Sanchez
The glass effect has been used by many designers and photographers to add depth and dimension to their compositions with a touch of modern elegance. There are, of course, many different ways to apply a glass effect in Photoshop, but today I will show you how easy it is to make your own glass texture and apply realistic distortion to any of your images using nothing but the default Photoshop tools.
Read more
How to Easily Make Your Vector Digital Signature
Tutorialsby Diego Sanchez
In today's digital life, whether you are a freelancer, a business owner, or simply someone who frequently engages in digital transactions, having a well-crafted digital signature is almost indispensable to add a touch of authenticity and credibility to your documents. So today, I will show you how easily you can make your own vector digital signature in Illustrator for you to sign your digital documents or incorporate it into any design work.
Read more
Easily Make an Editable Grunge Text Effect in Photoshop
Tutorialsby Diego Sanchez
There are different ways to make a grunge text effect in Photoshop while keeping your text fully editable, and the most known one is to use a texture as a layer mask to hide part of the text. But Today I will show you a differnt approach on how you can make this kind of effect, while keeping you text fully editable and at the same time give you a bit more control over that effect by using a texture in a new layer (instead of a layer mask) that you can later move, scale, replace or combine with other textures without replacing any kind of layer mask.
Read more